Adventures in Retro Development: SNES Edition
When I was growing up, the SNES was easily my favorite console. How could it not be, with top-tier games like Super Metroid and Mega Man X available? I had always wanted to learn how to program for the SNES so that I could develop my own silly games for the hardware that ran my favorite games as a kid. I decided to use this past holiday break as an excuse to finally get started, and I had a great time doing it! I love learning about old hardware and development environments, so this was really right up my alley. However it was a bit tough getting started, so I thought I would share some of my experiences in case it helps to spare others a bit of pain.
Just for context, I really knew very little about any of this before I dove in. I started learning programming around 2005-2006, and my first forays into graphics programming used DX9-capable hardware. This was a full two decades after the 65816 was first released, and well after the era of sprite and character-based display chips that the SNES graphics hardware was spawned from. My only prior experience in hand-writing assembly programs was a single micocontrollers class that I took in college, so I’m hardly an expert in that domain. The point here is that if I can learn how to program this crazy machine, I’m sure that you can too!
Hardware Basics
The SNES has a few main pieces of hardware that are relevant to the programmer:
-
The main CPU, which is a clone of a 65816
-
128 KB of RAM, referred to as “Work RAM” or WRAM for short
-
Anywhere from 256 KB to 4 MB of ROM data mapped directly into the CPU’s address space, depending on the cartridge.
-
The “Picture Processing Unit” (PPU), which is the dedicated sprite and background-drawing processor
-
64 KB of VRAM, which holds tile and map data used by the PPU for drawing sprites and backgrounds. Not directly accessible to the CPU!
-
A small bit of memory for storing sprite attributes used by the PPU (position, flipping, tile index, etc.), known as Object Attribute Memory (OAM). Also not mapped to the CPU’s address space.
-
Another small bit of memory for storing the 16 color palettes used by sprite and background tiles, known as Color Generator RAM (CGRAM). Each palette contains 16 15-bit colors.
-
A DMA unit that can be used to copy data between memory banks, including VRAM/OAM/CGRAM. Using this DMA freezes the CPU (they share the same bus), so it’s effectively synchronous.
-
A custom 8-bit Sony CPU used as a sound processor, called the SPC700. This guy is hooked up to an 8-channel DSP and 64 KB of its own RAM.
A more complete overview of the hardware can be found on the Super NES Programming Wiki. A full dump of all of the system’s internals can be found in the Nocash fullsnes hardware specification, which is definitely a link you’ll want to bookmark. It has a full list of the system’s memory-mapped registers used for I/O with the custom hardware, and it also has the complete mapping of the CPU’s address space. In my experience it has the most complete description of how the custom hardware works, which is vital for understanding the specifics of how to work with the PPU.
If you look around, you can also find a scanned copy of the original SNES development manual out there. While it’s fun to look at from a historical perspective, it’s honestly not really all that useful for actual development. It doesn’t do a very good job of explaining the more esoteric parts of the hardware, and its filled with mostly-useless “examples” that take the form of of large flow charts. The Nocache docs are a much better reference in my opinion, and much easier to navigate than a bloated PDF file.
The CPU and its Address Space
The main CPU is a variant of the 65816, which itself is essentially a 16-bit upgrade of the 6502. The 6502 really got around in the 70’s and 80’s, so you might be familar with it if you’ve done any programming for the Atari 2600/5200, NES, Apple II or Commodore 64. If you’ve done 6502 programming then you’ll feel right at home, since the operations and addressing modes are largely the same. If you’re not familiar with either of them (I wasn’t) then don’t worry too much, since these processors are fairly easy to understand. To get myself up to speed, I read through large parts of the 65816 Programming Manual. I found it to be thoroughly interesting and useful, since it starts out by introducing concepts for the 6502 and then works its way up through the new additions for the 65816. So if you already know the 6502 you can skip ahead, but if you don’t know either you can get the full package. It’s also written in a way meant to be accessible to a newbie programmer from the 80’s, so it’s pretty good at explaining even the basic concepts that an experienced programmer might take for granted.
In terms of programming 65816 assembly for the SNES, it’s pretty straightforward. All of the normal 65816 opcodes work, so general assembly programming guides like the one I linked are almost totally applicable. Probably the most annoying part of working the 65816 is the fact that you can switch its accumulator (A) and index registers (X & Y) between 8-bit and 16-bit modes by setting or clearing two bits in the status register. These not only affect the math operations that you can do on these registers, but they also affect the width of loads an stores performed with that memory. I tended to find myself having to switch to 8-bit mode fairly frequently in order to store a value to an 8-bit variable in memory, or an 8-bit I/O register. The fact that its a persistent state makes things extra confusing and error-prone, since you can’t tell which kind of operation is being done just by looking at a piece of assembly code. It also makes it really easy to screw things up by accidentally leaving the processor in the incorrect state expected by a macro or subroutine, leading to subtle bugs. I’ve found that some good documentation and conventions can go a long way in avoiding those issues. I feel like having explicit instructions for 8-bit and 16-bit operations would have been much easier from a programmer’s point of view, but c’est la vie.
To get started with writing your program you just need to know where your WRAM is located in order to store and load from memory, and also where your ROM data is located in the address space. Working with ROM is awesome: you just read from it like normal memory, with nothing special required to access it. This might be a big shock coming from modern game development where you typically need to use OS API’s to copy data from disk into RAM before you can actually use. Your code is also stored in ROM and usually you just execute it right from there, which lets you freely intermingle code and content.
To see where things are placed in the address space, you can look at the memory map. However the assembler you use can typically help you out here by letting you name different segments, and then specify which segment variables and data should be placed in when you declare them. One funky thing about the address space is that you’ll see the “system area” (which contains the I/O registers and first 8KB of WRAM) mapped in there multiple times. This is called “mirroring”, and its done to let you access those things without having to constantly switch the data bank register (DBR) or use long addressing mode. The basic gist is that its faster and more flexible for the processor to access things using a 16-byte offset from the 8-bit DBR (forming a full 24-bit address), so ideally you want to work within a single 64 KB bank of memory for as long as you can. The mirroring helps with this, since you can flip through different 32 KB chunks of LoROM and still be able to access the stuff in the system area:
+------+-------------+-------------------------+
| Bank |   Offset    | Contents                |
+----------------------------------------------+
| 0x00 |   0x0000    | System Area             |
|      |   0x8000    | First 32KB of LoROM     |
+----------------------------------------------+
| 0x01 |   0x0000    | System Area             |
|      |   0x8000    | Second 32K of LoROM     |
+----------------------------------------------+
| 0x02 |   0x0000    | System Area             |
|      |   0x8000    | Third 32K of LoROM      |
+----------------------------------------------+
| 0x03 |   0x0000    | System Area             |
|      |   0x8000    | Fourth 32K of LoROM     |
+----------------------------------------------+
| ...  |    ...      |    ...                  |
+------+-------------+-------------------------+
For assembling code and linking together the ROM, I used ca65. ca65 is a macro assembler, which means you can define macros that are functionally similar to C/C++ macros. They can also be used to implement unrolled loops, which is handy for cases where you don’t want to hand-write a dynamic loop for performance or convenience reasons. I’m sure there are other assemblers out there that could do the job, but ca65 seemed to work fine for me. It’s actually part of the cc65 package, which is a full C compiler and linker targeting the 6502 and friends. So while I’m sure you could somehow use that to write C code that runs on the SNES, I’m not sure of the specifics of how that would work in practice. Either way the limited register set and banked memory architecture of the 65816 doesn’t seem to lend itself particularly well to a C compiler implementation, so I steered clear of that. Besides, assembly is what the pros used back in the day! :P
The PPU
The PPU is what you would consider to be the “GPU” of the console, at least in a very rough sense. Its whole job is to make your sprites and backgrounds show up on the screen, and that’s really all it does. If you’re coming from the world of modern GPU’s (like me), some aspects of it will probably seem very foreign:
-
There are no “command buffers” or “commands” really. The only way you interact with the PPU is by setting its registers via memory-mapped IO (located in the system area), and by changing the contents of VRAM/OAM/CGRAM.
-
You can only interact with the PPU’s registers and memory during VBlank, or when the screen is entirely disabled (force blank). This means that you only have about 1.4ms to update your sprite/background state every frame during gameplay.
-
There’s no frame buffer! The PPU will draw your sprites and backgrounds on-the-fly as it’s generating each scanline. This is why you can only modify PPU state during VBlank, and also why there’s restrictions on the number of sprites per scanline.
Since the PPU only has a very limited set of functionality, it’s very particular about the data that you feed it. You need to strictly adhere to what the PPU expects, otherwise you’re just going to get a bunch of garbage on the screen. This can make it quite difficult to work with, especially when you’re just starting out. The PPU section of the Fullcash specs is going to be your best friend for getting this right, since it describes everything in full detail down to each individual bit.
PPU graphics are divided into two parts: backgrounds, and sprites. We’ll talk about backgrounds first.
Backgrounds
Backgrounds are essentially 2D grids of “tiles” that typically cover the entire screen, where each tile is either 8x8 or 16x16 pixels in size. You’ll also see these tiles referred to as “characters” in the official SNES documentation, which I suspect is a vestige of old text-mode display processors found in early PC’s. The way it works is that you have a “map” stored in VRAM, which is a 2D array of integers that specify the index of the tile that you want to use for each slot of the map. The idea is that you can re-use the same tiles (often called a “tile set”) many times across a given map, which is critical when you consider that 256x256 worth of 4bpp tiles would consume 32 KB of VRAM! The ability to re-use tiles is aided by the fact that you can also flip the tile horizontally or vertically for each map entry, and also specify the palette to use. Careful use of flipping and palette switching could create the impression of a much larger tile set than what you can actually fit in VRAM.
The tiles pointed to by a BG map are either 8x8 or 16x16 in size, and either 4bpp (16 color) or 2bpp (4 color) indexed color. For the 8x8 tile size, things are pretty simple in terms of how the tile index works in the map. Each tile is stored in a swizzled bit-plane format, where a single tile is all contiguous is memory. So you’ll have 32 bytes for tile 0, then 32 bytes for tile 1, and so on. So your map just specifies the index of the tile it wants, and that’s it. For the 16x16 BG tile size, it’s more complicated. A 16x16 tile has to be split up into 4 8x8 sub-tiles, one for each corner. The BG map then specifies the index of the upper-left 8x8 sub-tile. The trick is that these sub-tiles can’t be located contiguously in VRAM, which makes VRAM management rather annoying. Instead, the PPU treats the tile memory as if it were a 16x64 2D array of sub-tiles. The 16x16 meta-tile then needs to be stored so that the top two sub-tiles are on the one row of the 16x64 table, while the bottom two sub-tiles must be located on the next row. Effectively this means that there’s a gap of 14 sub-tiles between the top and bottom portions of the meta-tile, which works out to be 448 bytes (224 words) . Trust me when I say that this is easy to screw up.
Here’s what the placement of a 16x16 tile in VRAM looks like if you were to put its top-left corner in the first tile entry in VRAM:
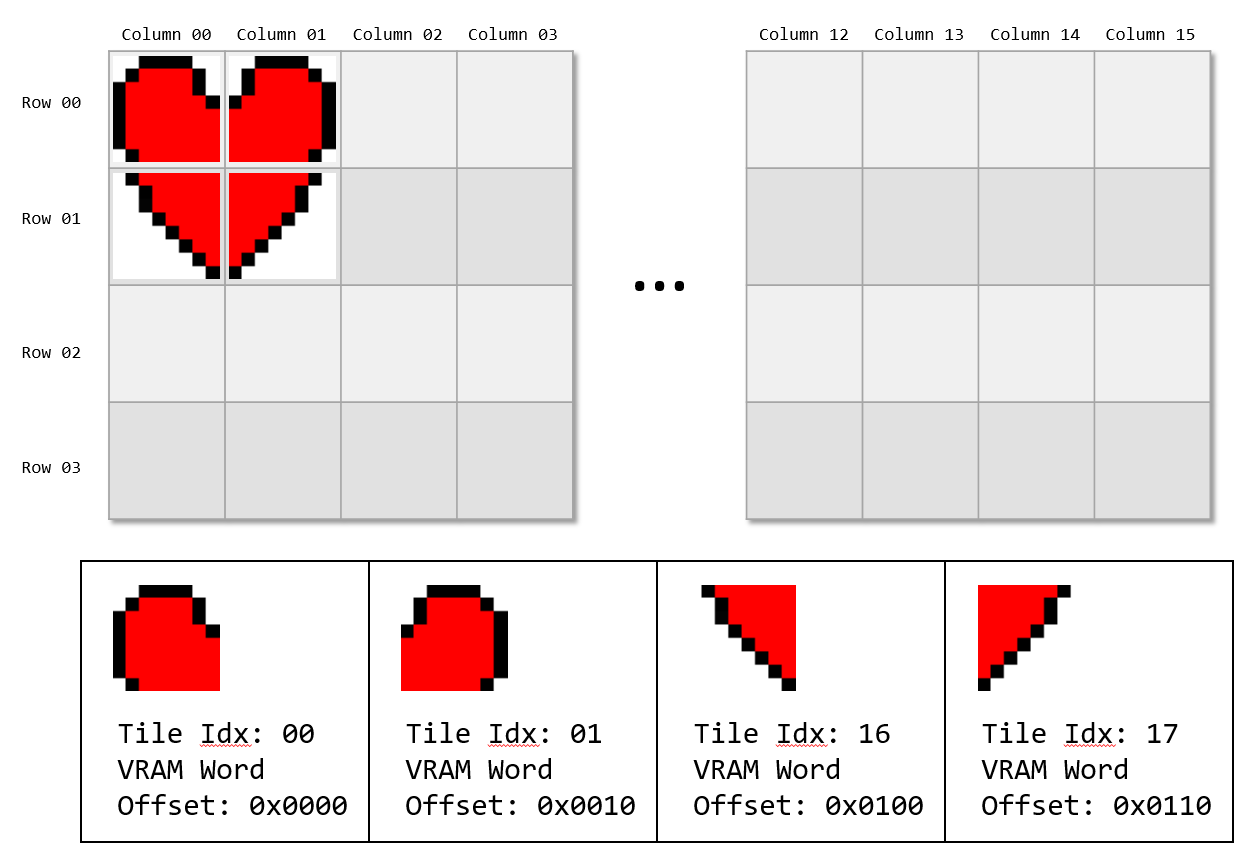
At the bottom you can see that the bottom-left sub-tile needs to be placed 14 tiles after the previous sub-tile so that it ends up on the next row of the VRAM tile matrix. Therefore you would want to DMA it to an offset of 0x0100 words from the start of the tile table in VRAM (VRAM generally deals with memory in terms of 2-byte words).
Each background layer, of which there are up to 4 at once depending on how you’ve configured the PPU, will typically use a map of 32x32 BG tiles. For an 8x8 tile size this covers 256x256 screen pixels, which is more than enough to cover the entire 256x224 screen resolution. Each background layer has a 10-bit pixel offset that will nudge the whole grid of tiles by specified X and Y values, which allows for smooth scrolling. The map will wrap around in areas exposed by the BG offset, which means if you have a tiled background you can just scroll it forever. In practice most games would constantly be updating the outer edges of the BG map in order to display a level much larger than what’s implied by a 32x32 grid of tiles. They would also scroll some of the layers at a slower rate than the “primary” background layer, which would approximate a parallax effect for things far off in the distance. Another background layer could also be used for a HUD and/or status bar.
Sprites
As we just covered, backgrounds are made up tiles that are implicitly laid out in a 2D grid. So you can’t just specify an arbitrary screen position for any single tile, or have one tile overlap another tile. Sprites (also called “objects”) are different: you directly tell the PPU where to draw the tiles by writing X and Y positions into Object Attribute Memory. So instead of a 32x32 map containing just tile indices and a few attributes, you have a 128 element array containing X/Y positions, tile indices, and a few attributes. Basically sparse tiles instead of a grid. Sprites can be 8x8, 16x16, 16x32, 32x32, 32x64, or 64x64 depending on the value of the OBSEL register, with only 2 sizes available for a given frame. The sizes large than 8x8 are set up as meta-tiles in the same way that BG tiles work: subsequent rows in the meta-tile must be located 16 tiles apart in VRAM. So a 32x32 sprite would have its sub-tiles placed in VRAM as 4 rows of 4 8x8 tiles, with a gap of 12 tiles because the end of one meta-tile row and the start of the next meta-tile row. This can make it annoying to move a single sprite into VRAM, since it means that you need to do it as 4 separate DMA operations.
Development Environment
To get a jump start on making a working SNES ROM, I used libSFX, which was developed by David Lindecrantz. This library is a collection of basic tools combined with a bunch of headers for ca65 that are full of macros and defines that correspond to the particulars of the SNES. It definitely saved me a lot of time that I would have otherwise spent going back and forth between my code and the SNES specs to get the right I/O addresses and bit offsets. It also does all of the magic incantations to boot up the system in the expected state (which is something you have to do on a system with no O/S!), which is pretty helpful. On top of all of that it has a makefile template and config system that makes it pretty simple to get your code assembled and linked into the layout expected for an SNES cartridge.
libSFX also includes a tool called SuperFamiconv, which is a command-line program that convert .PNG’s into a binary format that can be (almost) directly consumed by the PPU. It will auto-generate a palette, carve up your image into 8x8 tiles, and munge those tiles into the 2bpp or 4bpp bitplane format used in VRAM. For backgrounds it can also attempt to automatically de-duplicate the tiles in the image to generate a tileset, and will spit out a BG map in the required binary format. By linking the outputs right into your ROM, they’re immediately available to be DMA’d into VRAM at runtime, which is pretty sweet. The tool is also tied into the makefile template for libSFX, essentially forming a basic content processing pipeline. However you still need to be careful about making sure that your sub-tiles end laid out correctly in VRAM, since SuperFamiconv will end up packing all of its data contiguously. One option might be to pre-assemble atlases of tiles/sprites in a PNG in a way that’s aware of the weird “16 columns of tiles” setup and then copy large blocks at level transitions. For backgrounds larger than 32x32 you’ll also need to do your own on-the-fly updating of the BG map in VRAM like I mentioned earlier. I would also imagine that for any non-trivial game you would want to use a proper tile-based map editor to assemble your levels, rather than trying to rely on SuperFamiconv to de-duplicate things for you.
One wrinkle with libSFX is that it’s really only set up to work on Unix-like systems. Getting something this to work on Windows would traditionally involve Cygwin, which is an experience I normally don’t subject myself to in my free time. However for Windows 10 there’s now an alternative called the Windows Subsystem for Linux (WSL). This essentially allows you to install a real Linux distro and have it interact with the Windows file system and executables, with no VM’s required! I decided that this was as good an opportunity as any to try it out, so I went ahead and installed Ubuntu from the Microsoft Store (wild!) and within minutes I was in a bash shell! From there I just ran sudo apt install gcc/g++/make, and I was ready to clone and build libSFX! I was constantly surprised by how well everything worked, especially for someone like me that has very little Linux experience. What’s really cool is that you can invoke Linux from Windows command prompt or batch file by running “wsl.exe”, effectively allowing you to go in and out Linux from within your scripts. In the end I had one batch file that ran “wsl.exe make” to build the ROM, then another batch file that would launch snes9x with that ROM.
In the CPU section I mentioned that the 65816 can be switched between 8 and 16-bit register sizes, and that it can be a source of much pain. libSFX has a series of “RW” macros that to alleviate some of that pain by tracking the current register state in preprocessor variables. This lets it try to filter out redundant size changes, and also lets you print out whichever state is currently set (or more specifically, the state that the preprocessor thinks is set). Unfortunately being a preprocessor that’s part of an assembler, it can only track state as it assembles your code in top-down fashion. This means that the internal state can and will be wrong any time a branch or jump occurs, and its up to you to give it enough information to keep it from screwing up. In particular you need to strategically use RW_assume in order to inform the assembler of the expected state, and possible also deploy RW_forced as your nuclear option. In practice it kind of feels like this tracking system is more trouble than its worth, but I think I would need to use it longer to form a better opinion. Either way, just make sure that you take some time to familiarize yourself with it before diving in! Many of the helpful macros provided by libSFX will use the RW macros internally, so you’ll need to at least play nice with it at those points in your code. Also, be aware that libSFX will set the processor to a8i16 mode before handing control off to your Main label, and also when calling your VBlank handler.
Debugging
While it’s a bit of a bummer that you can’t really run your game on real SNES hardware without jumping through some serious hoops, the upside is that emulation allows for some really cool debugging functionality. You can do a lot when the entire state of the machine is visible to you! In particular, I would recommend using no$sns, by Nocash. It allows you to…
- View the disassembly of the running code
- Set breakpoints
- Inspect CPU registers and memory
- Inspect I/O register states for the PPU/DMA/etc.
- Visualize tiles in VRAM
- Visualize the BG map
- Visualize sprites in OAM
- Visualize palettes in CGRAM
- Probably more things that I didn’t get around to using!
The tile visualization in particular is really helpful for making sure that you get the layout right. Just make sure that you switch the disassembly mode to the Native 65XX mode, otherwise it will look very odd!
Gotchas and Insights
There were definitely a few things that caused me to lose a bunch of time before I could figure out what’s wrong. I also noticed a few ways to speed up my programming. Here they are, in no particular order:
-
I mostly covered this already, but always keep track of your register sizes! This was perhaps my most common source of bugs, at least when I was first starting.
-
This was also covered earlier, but make sure that your sub-tiles are in the right location in VRAM!
-
Be careful not to omit the “#” when you want to load an immediate. There’s no type-safety to help you if you forget it, in which case you’ll load from that address instead.
-
.proc is helpful for scoping constants and labels for a subroutine, ensuring that they don’t clash with constants/labels from your other suboutines. There’s also “proc” from libSFX, which does the same thing but also tries to ensure that the RW state is initialized appropriately. Just be aware that you may need to prefix global defines with “::” when you’re inside of a .proc in order to let ca65 know that you’re referring to something in the global scope.
-
Use the direct page! It’s easy to feel cramped with only 1 true register to work with, but working with values in the direct page is fast because the operands are smaller. So you generally want to use it for storing temporary variables that you’re dealing with in a subroutine. Just make sure that you prefix the address with “z:” to make sure that ca65 emits the zero-page version of the instruction. libSFX also sets up a “ZEROPAGE” segment for you in the default config, which you can use for declaring variables that live in the direct page.
-
Memory isn’t slow relative to the CPU! I had to keep reminding myself of this, since I’m so used to modern systems where a cache miss might mean thousands of cycles in latency.
-
Make sure that you always clear the carry before an adc, and set the carry before a sbc! libSFX defines “add” and “sub” macros that will do this for you, so feel free to use them.
-
Enable the debug variable in your makefile you have the linker output a map file that you can use to see the actual addresses of your variables and labels.
Things I Didn’t Cover
-
Mode 7 - the infamous Mode 7 is very different from the “normal” background modes, and has plenty of its own weird quirks. Be sure to carefully read through Nocash specs if you’re interested in using it.
-
Audio - I haven’t spent any time learning how to program the audio processor, so I would be of no help in that area. I did manage to get some music playing, however. An awesome co-worker made a quick looping track in Schism Tracker, and I was able to convert it into an SPC file using SNESMOD. I was then able to link that into my ROM, and start up the SPC program to play that music!
Links
- fullsnes - nocash SNES hardware specification
- Super Famicom Development Wiki
- Super NES Programming WikiBook
- SNES Development Forum on nesdev.com
- SNES Graphics Information
- 65816 Assembly Programming Guide
- libSFX GitHub Repository
- ca65 User’s Guide
- ld65 User’s Guide
- SNESMOD
- Schism Tracker
- SNES Game Sound System
Good luck, fellow retro developers!
Comments:
Fun writeup! What did you end up getting running? Any screenshots?
#### [MJP](http://mynameismjp.wordpress.com/ "mpettineo@gmail.com") -
Hey Matt! I basically had a very simple side-scrolling shooter working, where you could shoot a few infinitely-spawning enemies. It featured the main character “Jack” from our Lone Echo game series (I called my game “Super Lone Echo, naturally), so I had been meaning to clear it with my company’s owner before posting images or video. I guess I should actually do that at some point! :P