A Closer Look At Tone Mapping
A few months ago my coworker showed me some slides from a presentation by tri-Ace regarding their game “Star Ocean 4”. The slides that really caught my eye were pages 90 to 96, where they discussed their approach to tone mapping. Instead of using the standard Reinhard tone mapping operator that everybody is so fond of, they decided to instead use curves based on actual specifications from different film types and CMOS sensors. This not only produced some really nice results (the screenshots in the slides speak for themselves), but it fit very nicely into their “virtual camera” approach towards post processing. While I was intrigued by their approach, it wasn’t until I read through John Hable’s recent presentation on gamma and HDR lighting that I decided to start doing my own research. His presentation gave an overview of Uncharted 2’s approach to tone mapping, which (like Star Ocean 4) eschews Reinhard’s operator in favor of mimicking a filmic response curve. Once again the images in the slides speak for themselves, and they intrigued me enough to make me dig deeper.
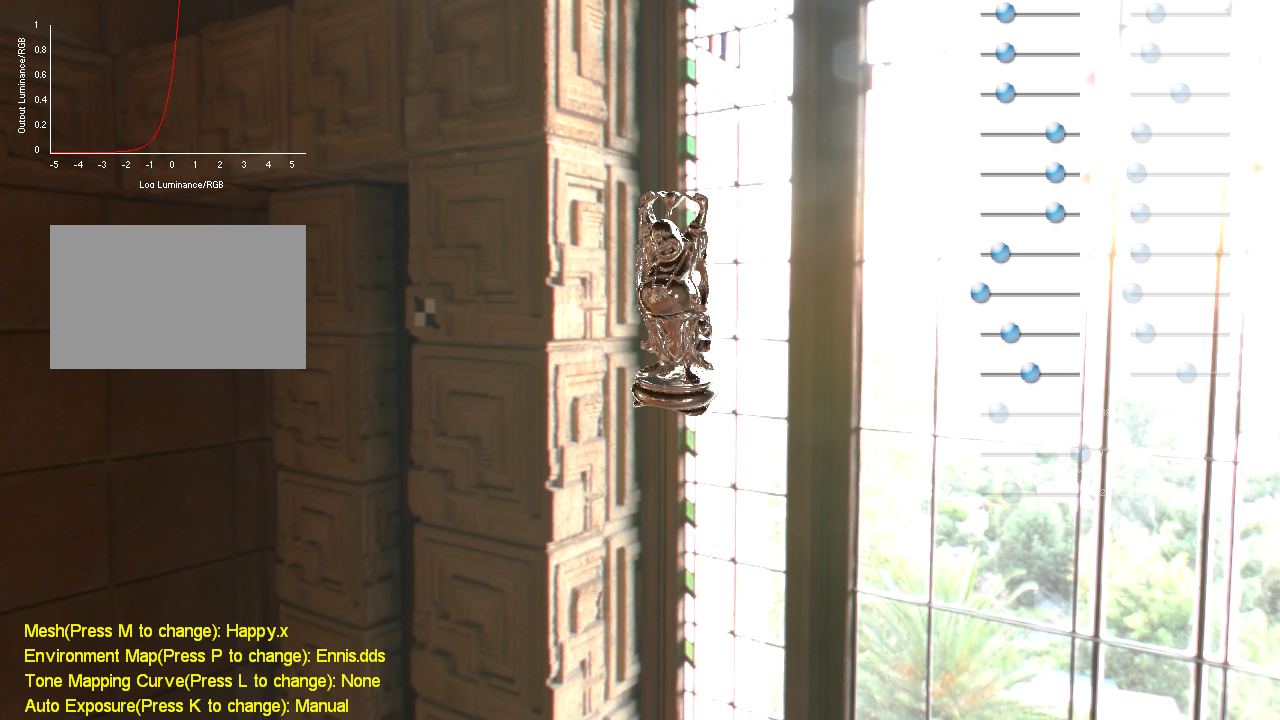
Like always, I started off by making a test application that would let me try out different approaches and observe their results. Initially my app started out with approach taken by pretty much every other HDR sample out there: render a model and a skybox to a floating-point texture, calculate the log luminance of the scene and repeatedly downsample to determine a single log-average luminance value, and then use that value in Reinhard’s tone mapping equations to scale pixel values down to the visible range (if you’re not familar, this “standard” approach is outlined in detail here). At this point I thought I would just copy over Hable’s equations and I would have something nice…but after some ugly results I realized I needed to take a step back and rethink the process a bit. After some experimentation and a bit of reading through High Dynamic Range Imaging, I started to think of the whole process in terms of a more generalized approach:
1. Run a (simplified) light transport simulation, and determine the amount of incoming light energy for each pixel. This is done by rendering all objects in the scene, and determining the energy reflected off an object’s surface towards the camera/eye. Ideally for this step we would use radiometric units (radiance/irradiance) to represent light intensity and we would also maintain the distribution of that energy across the entire visible spectrum, but to actually make this feasible on graphics hardware we run the simulation for 3 discrete wavelengths (red, green, and blue). In my app, this step is performed by rendering a single mesh and sampling an HDR environment map to determine the amount of light reflected off the surface. For a background the environment is sampled directly by a skybox.
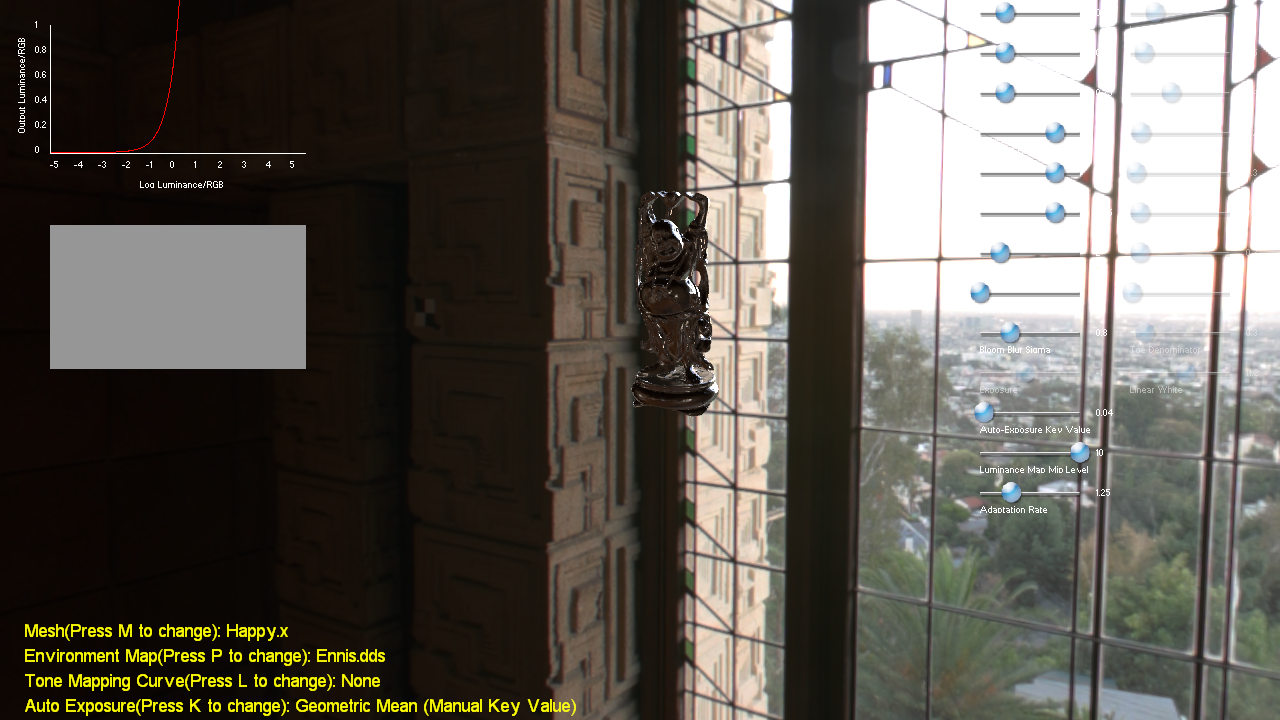
2. Scale the incoming light to determine the amount that would hit the film/sensor/retina. This step is referred to as “calibration.” One possible way to implement this stuff is to model a camera, where the total amount of light that hits the film is affected by the focal length of the lens, the aperture size(f-number), and the shutter speed. Together they can be manipulated to scale range of incoming light intensities such that the important parts of the scene are neither under-exposed nor over-exposed. In my app I kept things simple, and exposed three different methods for calibration:
-
Manual exposure: a slider lets you choose values between -10 to 10. The HDR pixel value is then scaled by 2^exposure.
-
Geometric mean of luminance: this is pretty much the exact approach outlined in Reinhard’s paper, where the geometric mean (log average) of scene luminance is calculated and used to scale the luminance of each pixel. With this approach a “key value” is user-controlled, and is meant to be chosen based on whether the scene is “high-key” (bright, low contrast) or “low-key” (dark, high contrast).
-
Geometric mean, auto key value: Same as above, except that the key value is automatically chosen using Equation 10 from this page.
To calculate the geometric mean, I simply calculate the log of luminance and write the results to a 1024x1024 texture. I then call GenerateMips to automatically generate the full mip-map chain. At that point I can apply exp() to the last mip level to get a full log-average of the scene. One extra trick I added to my app was a slider that let you choose the mip level that would be sampled when scaling the pixel intensities. Doing this allows you to essentially use local averages rather than a global average, which lets you have different exposure values for different parts of the image. In my app, there’s a display below the tone curve that shows the average luminance value being used for each part of the image.
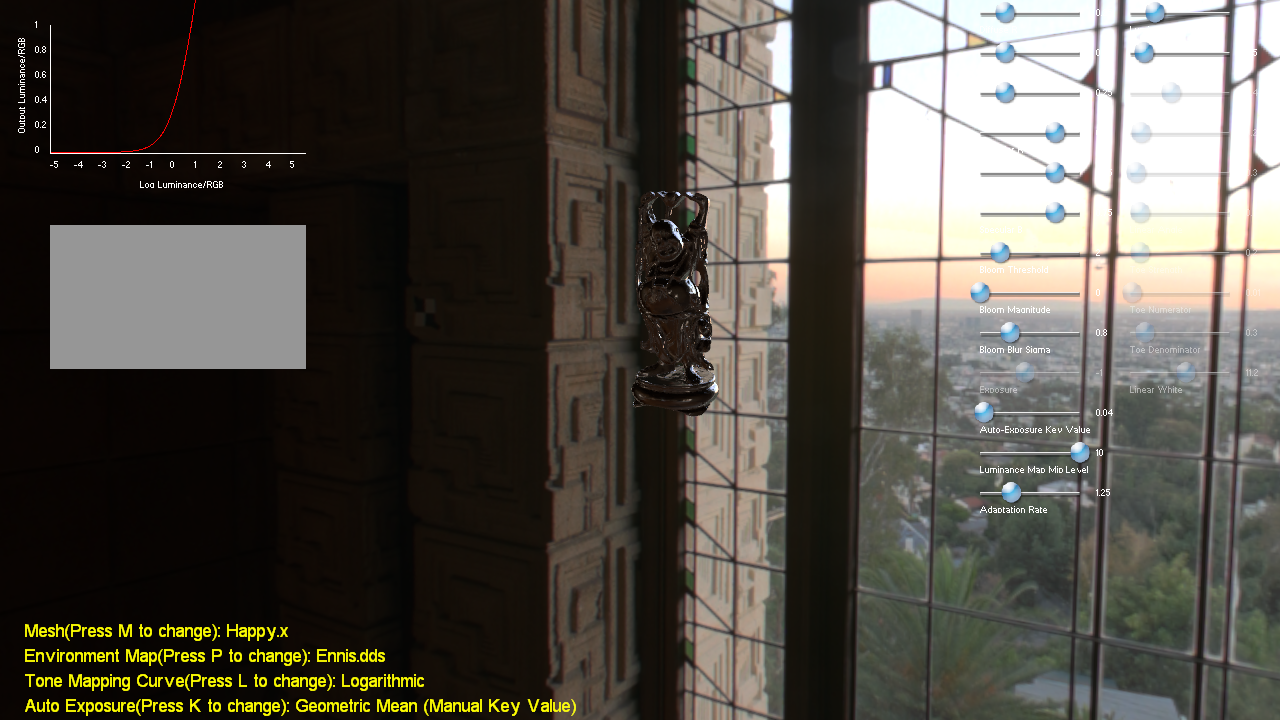
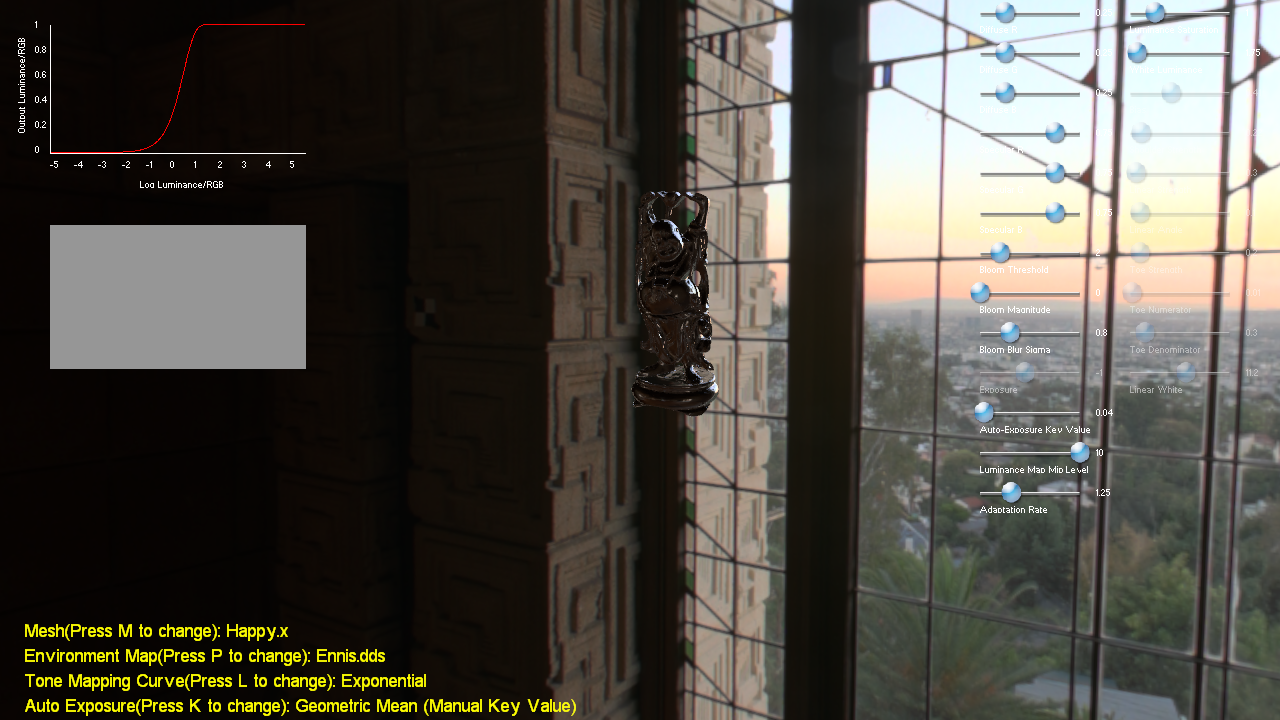
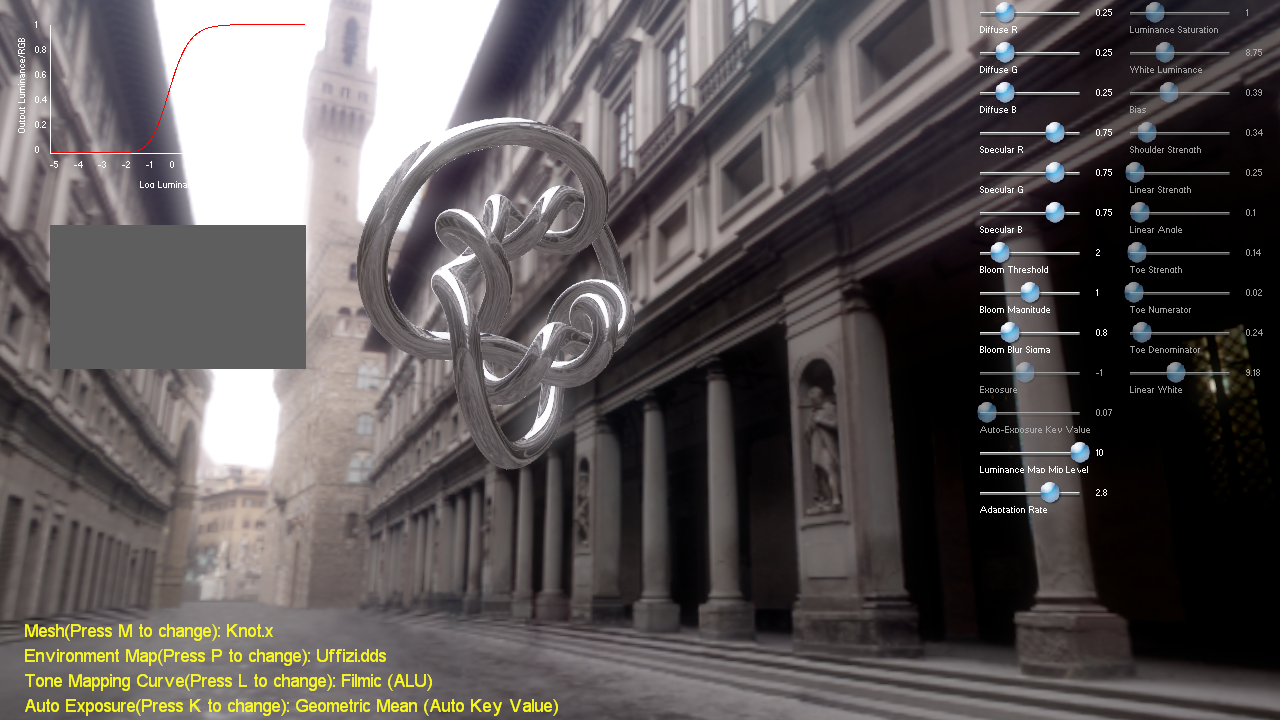
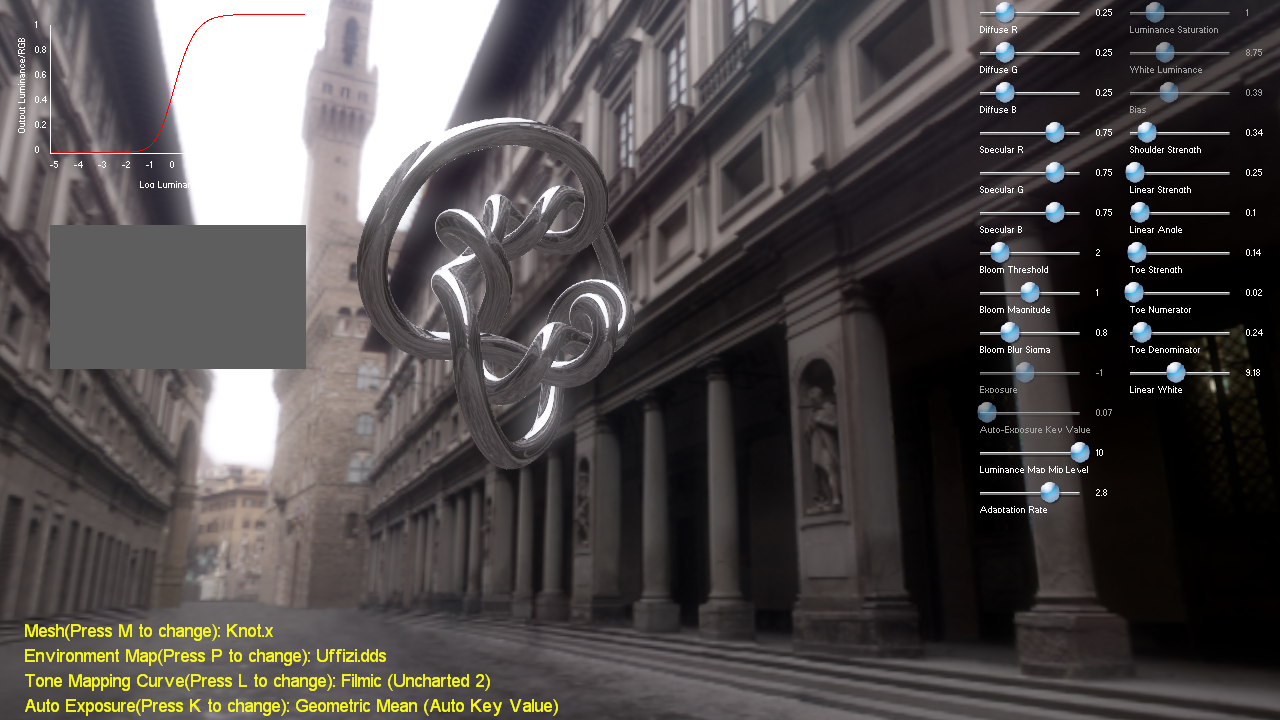
3. Map calibrated light intensities to display values by applying a tone curve to either RGB values or luminance values. This curve can have a significant impact on not only which details are visible in the final image, but also the overall visual characteristics. Because of this I find it difficult selecting the right curve for a particular scene…in some cases you can pretty objectively determine that one curve is better than another at making details visible, but at the same time some curves will subjectively look better to my eyes due to their resulting levels of contrast and saturation. My app offers a variety of curves to choose from, including:
- Linear
- Logarithmic
- Exponential
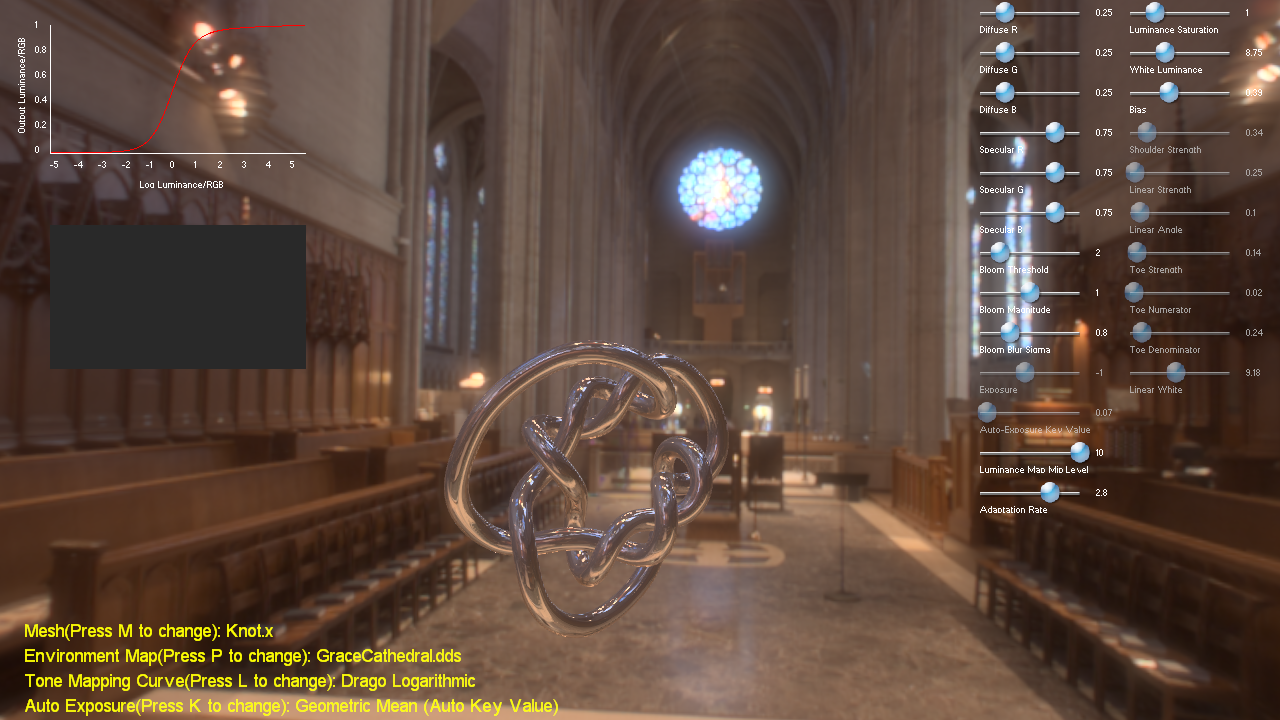
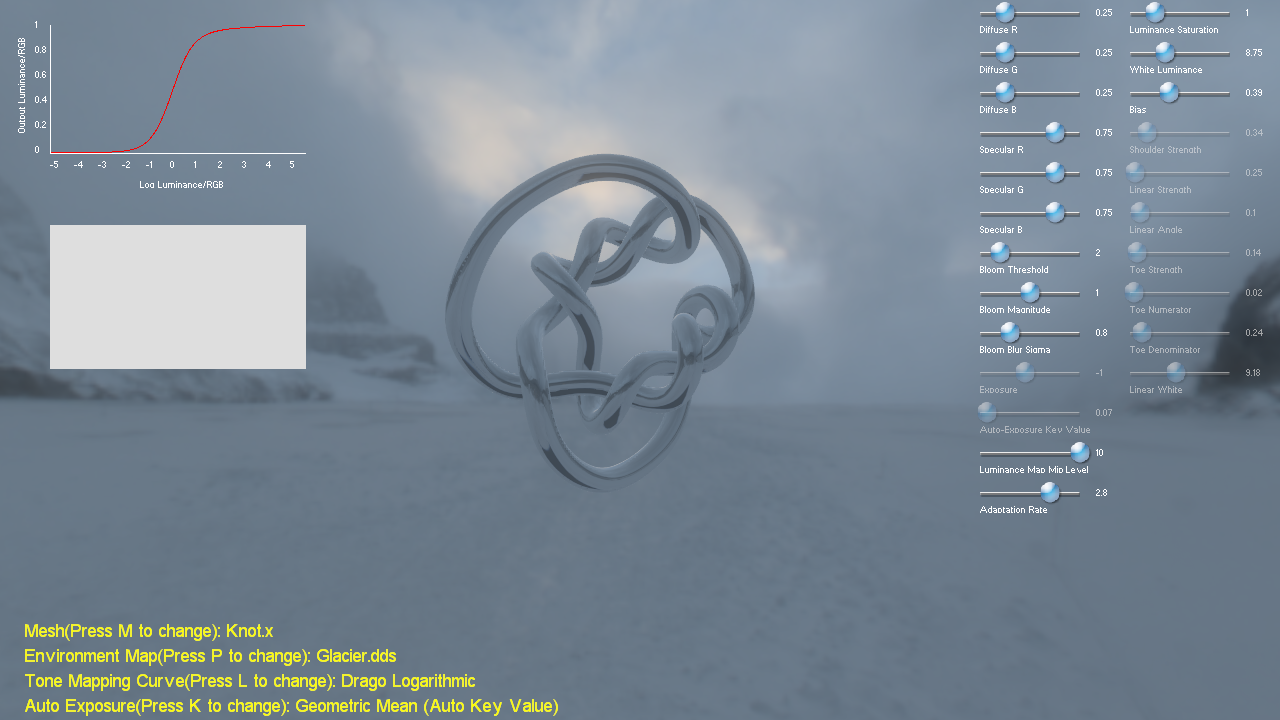
- Drago’s Adaptive Logarithmic
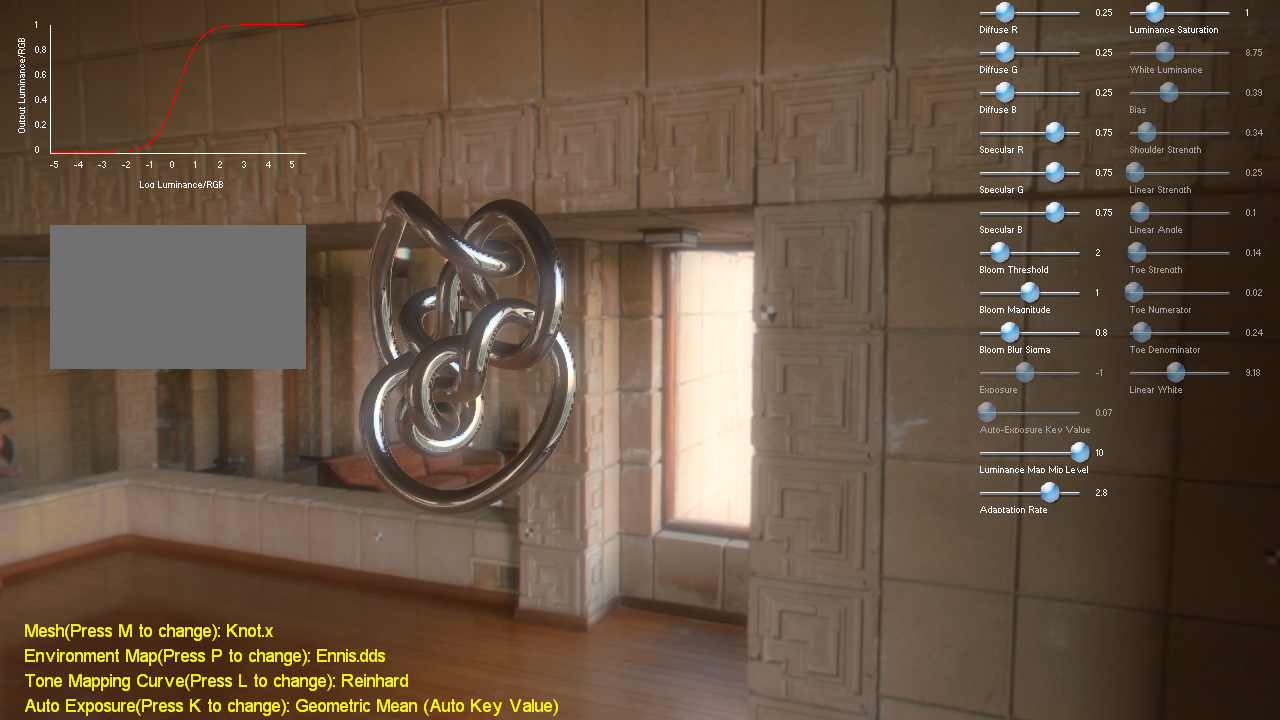
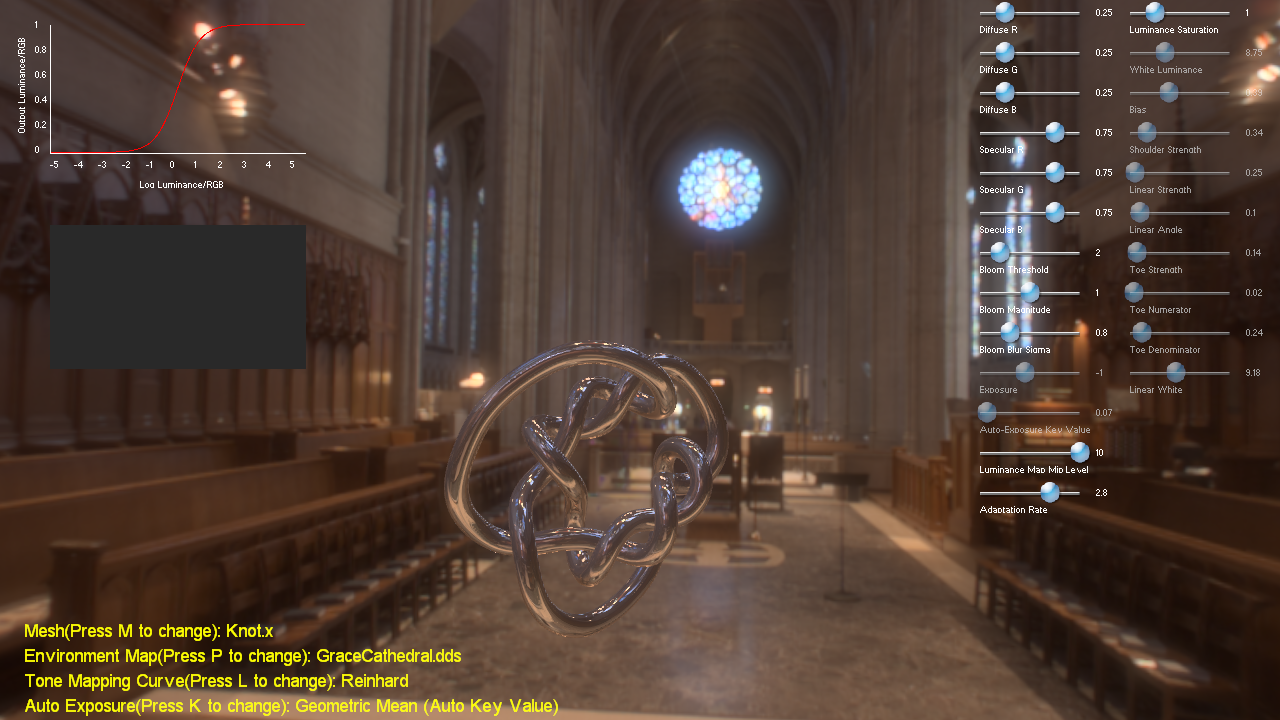
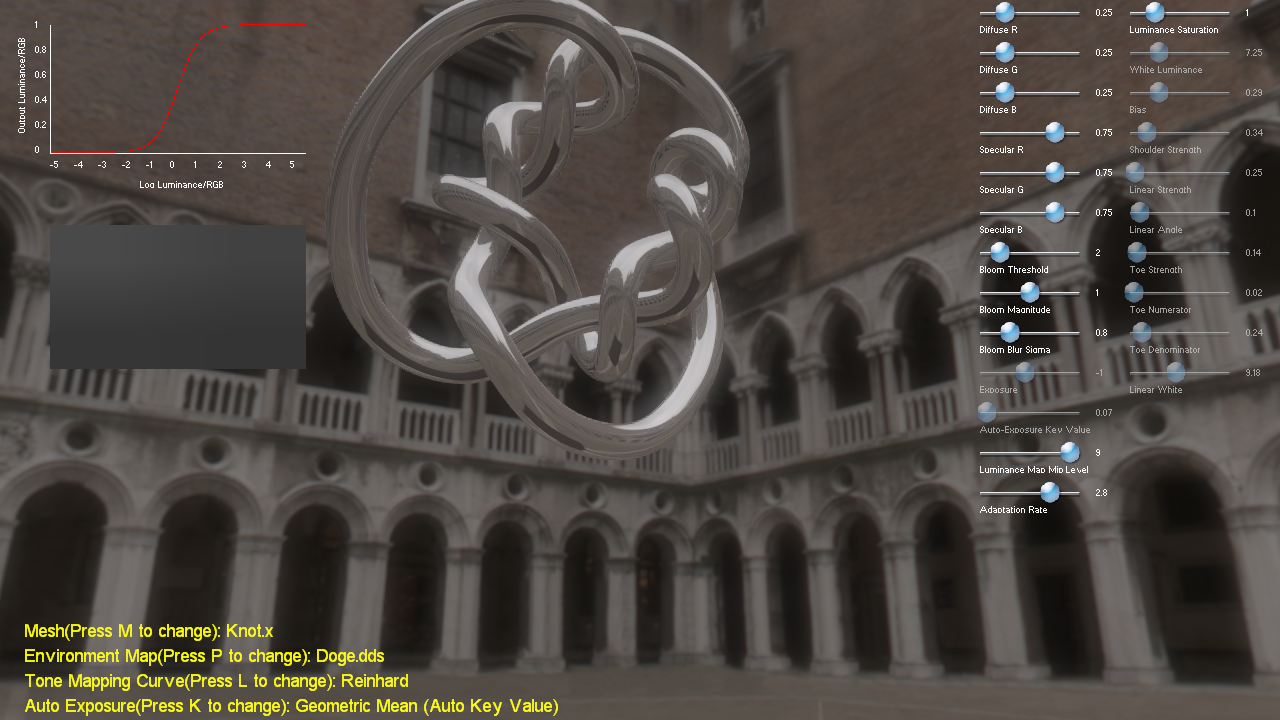
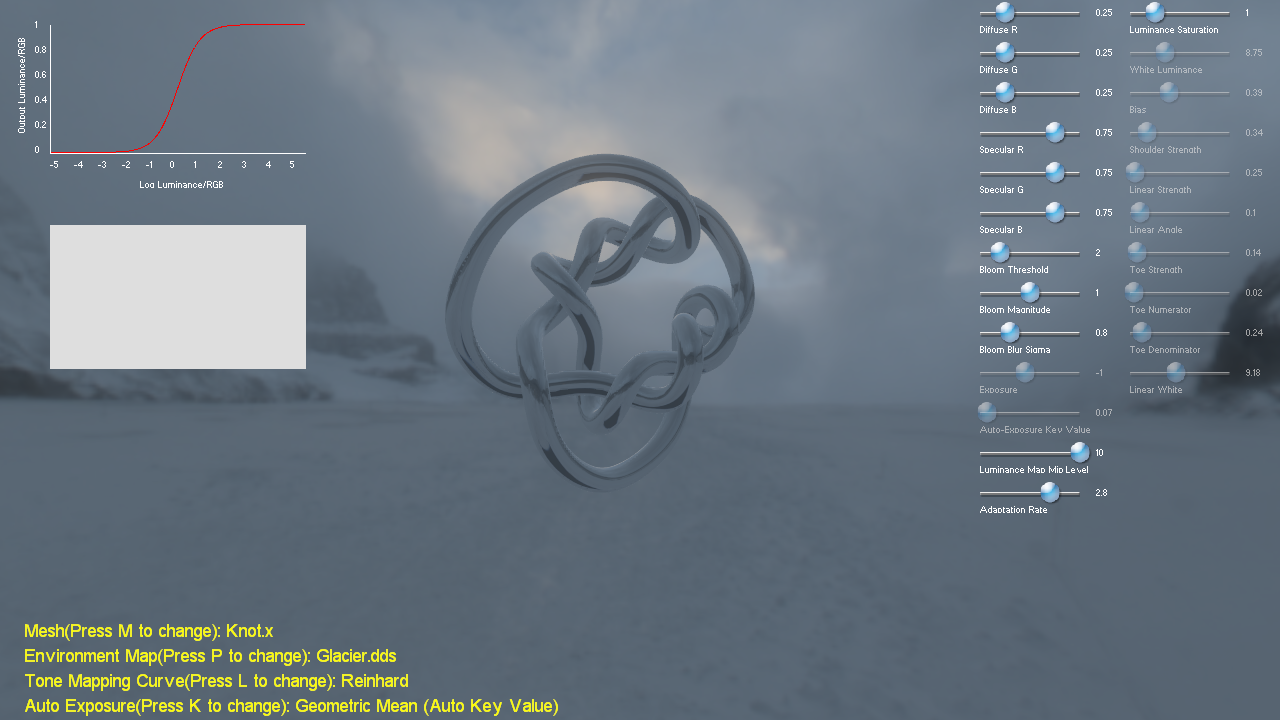
- Reinhard (Equation 3)
- Modified Reinhard (Equation 4)
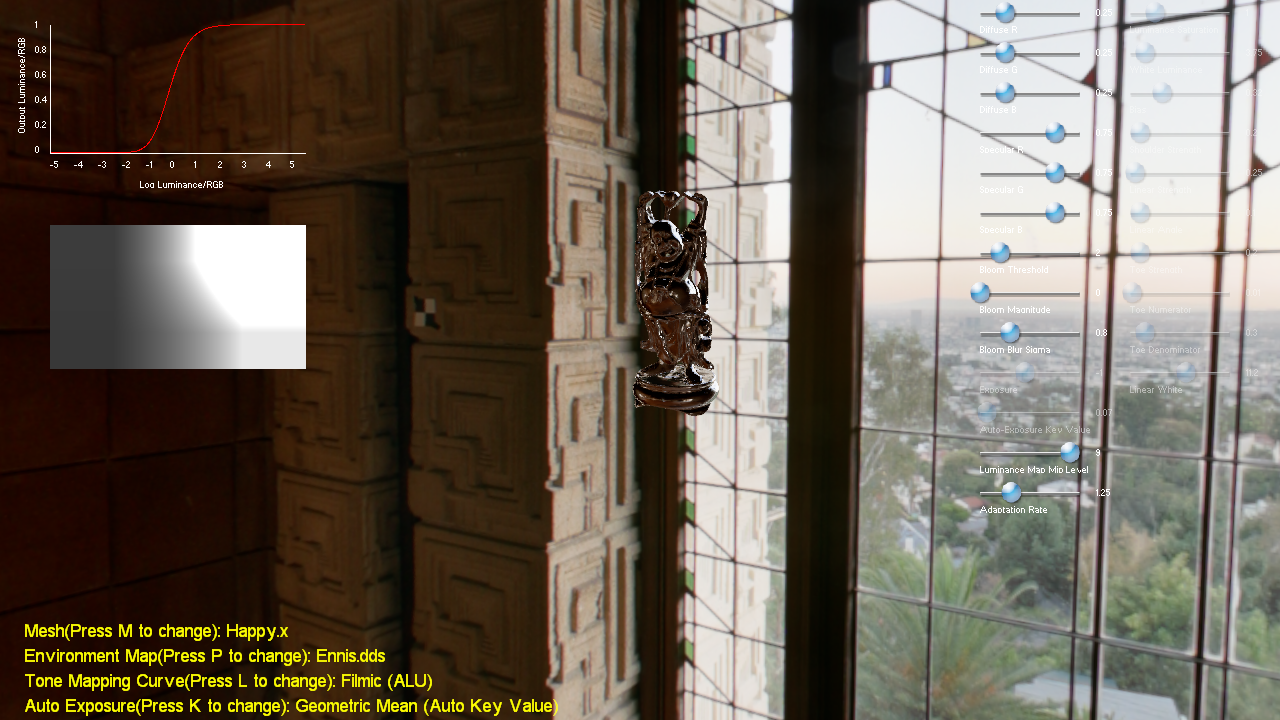
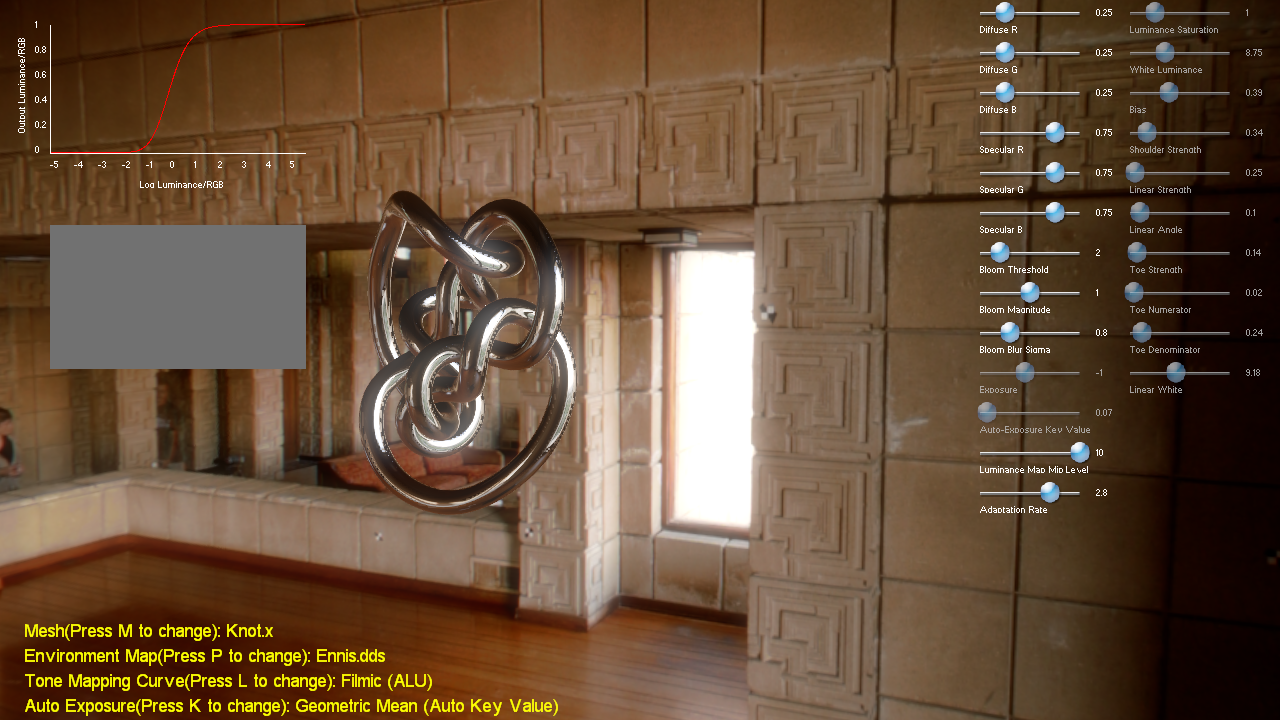
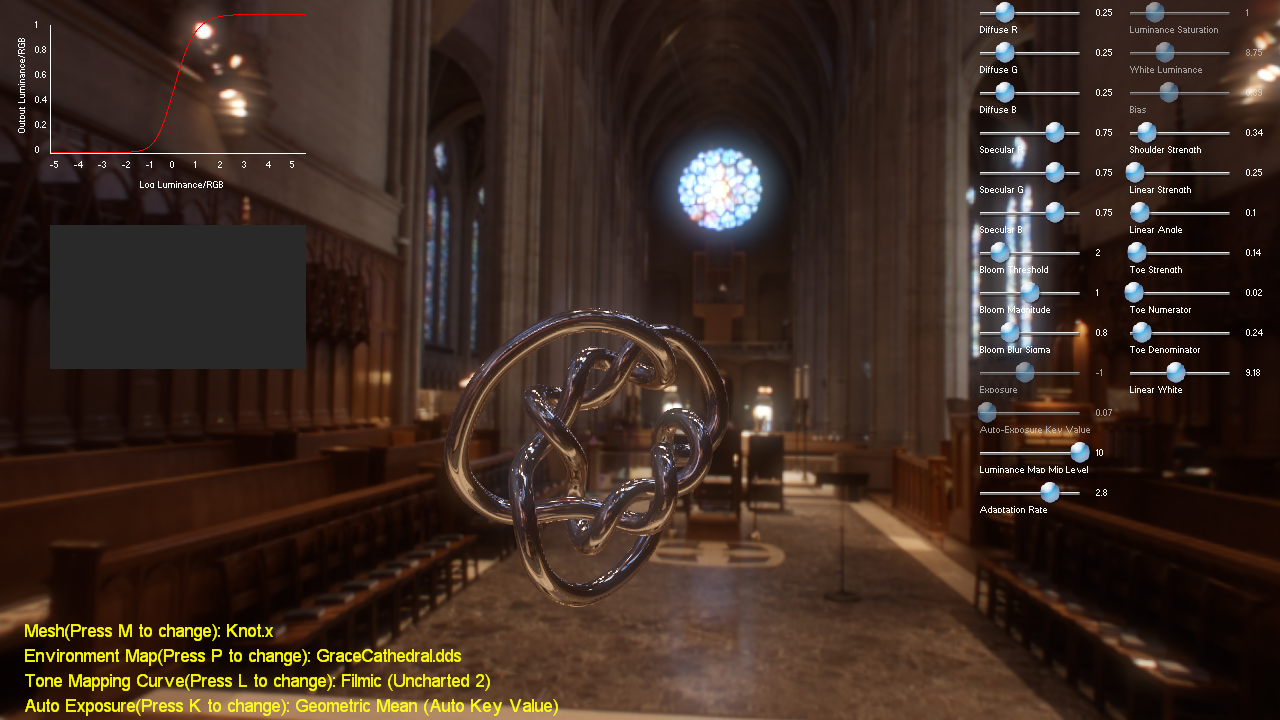
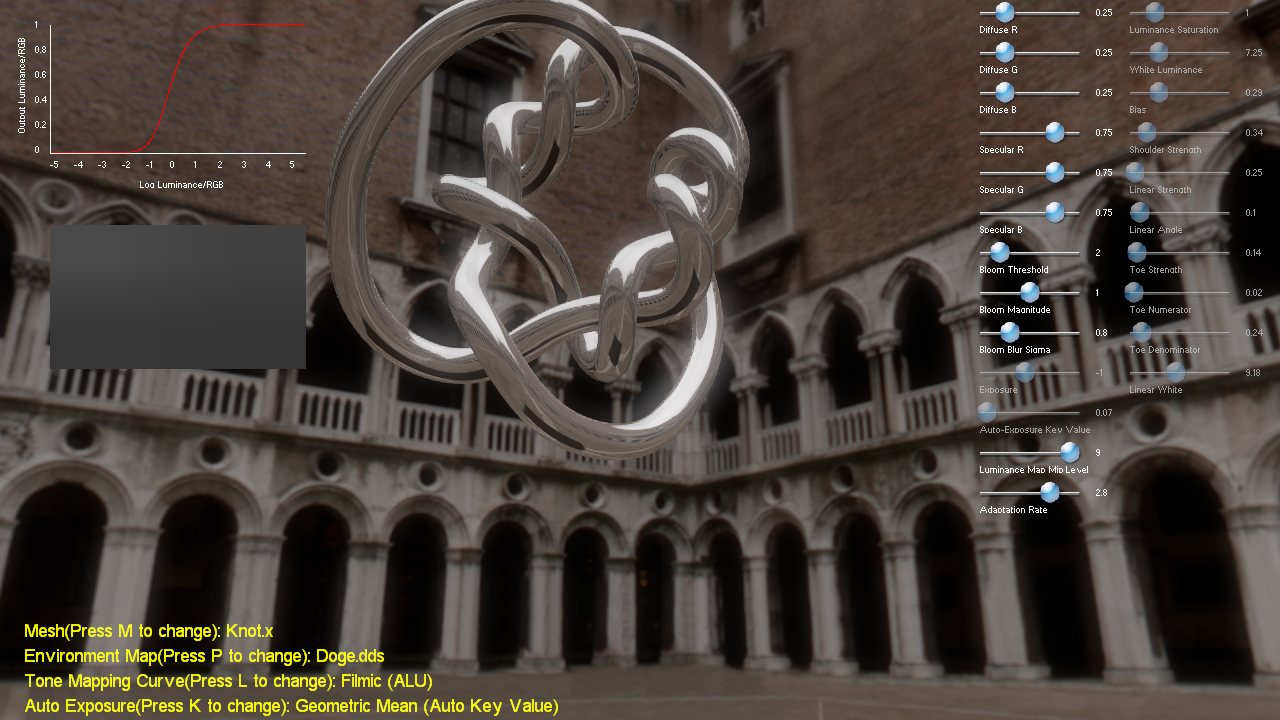
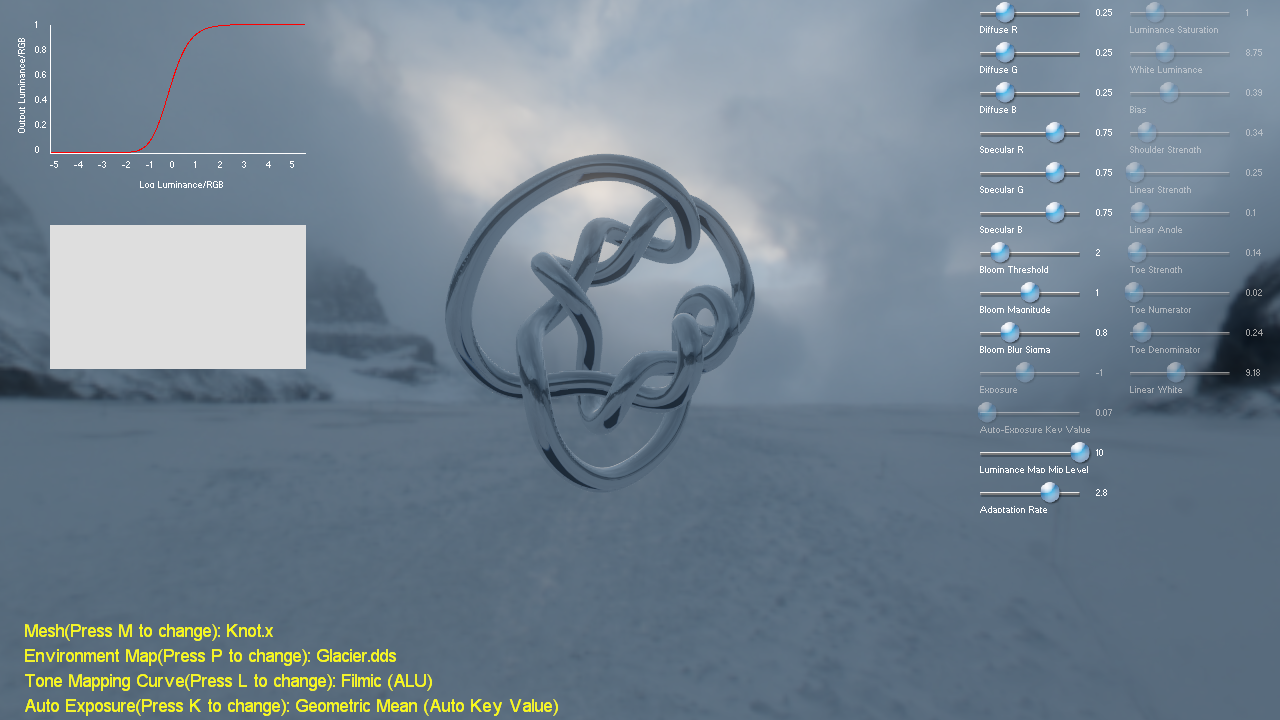
- Filmic (Haarm-Pieter Duiker’s curve, using the ALU-only version from Hable’s presentation)
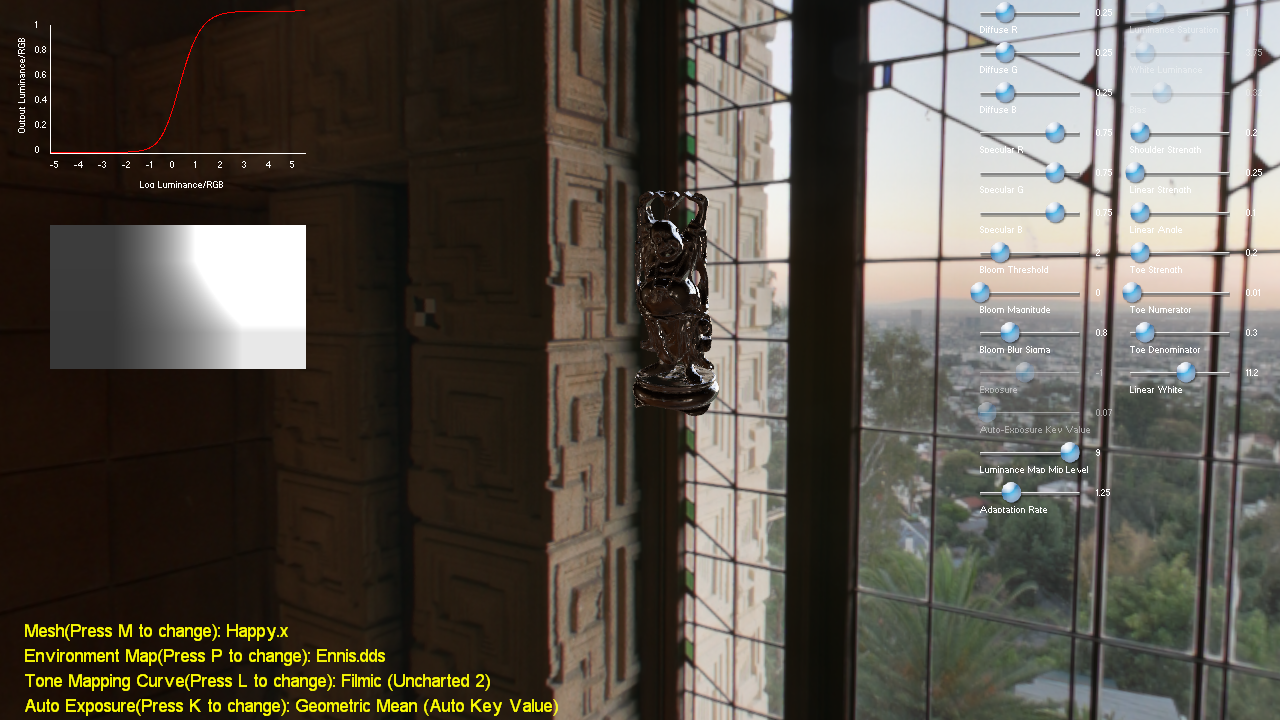
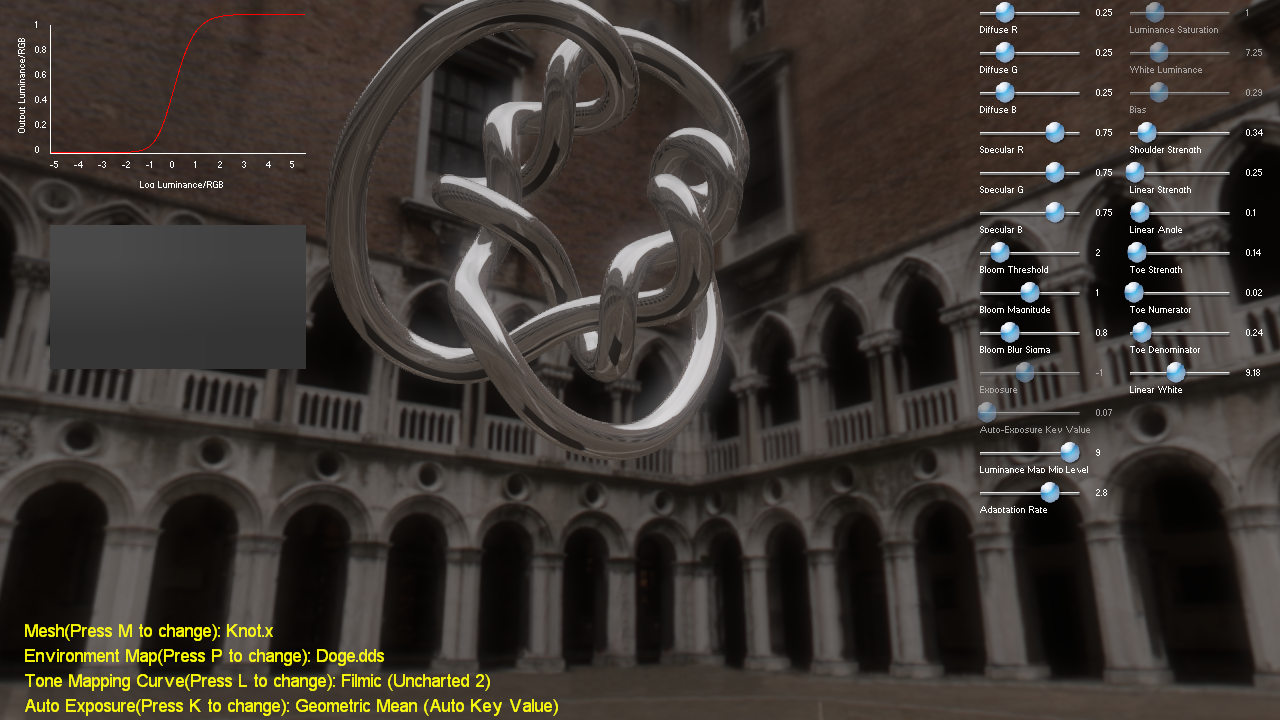
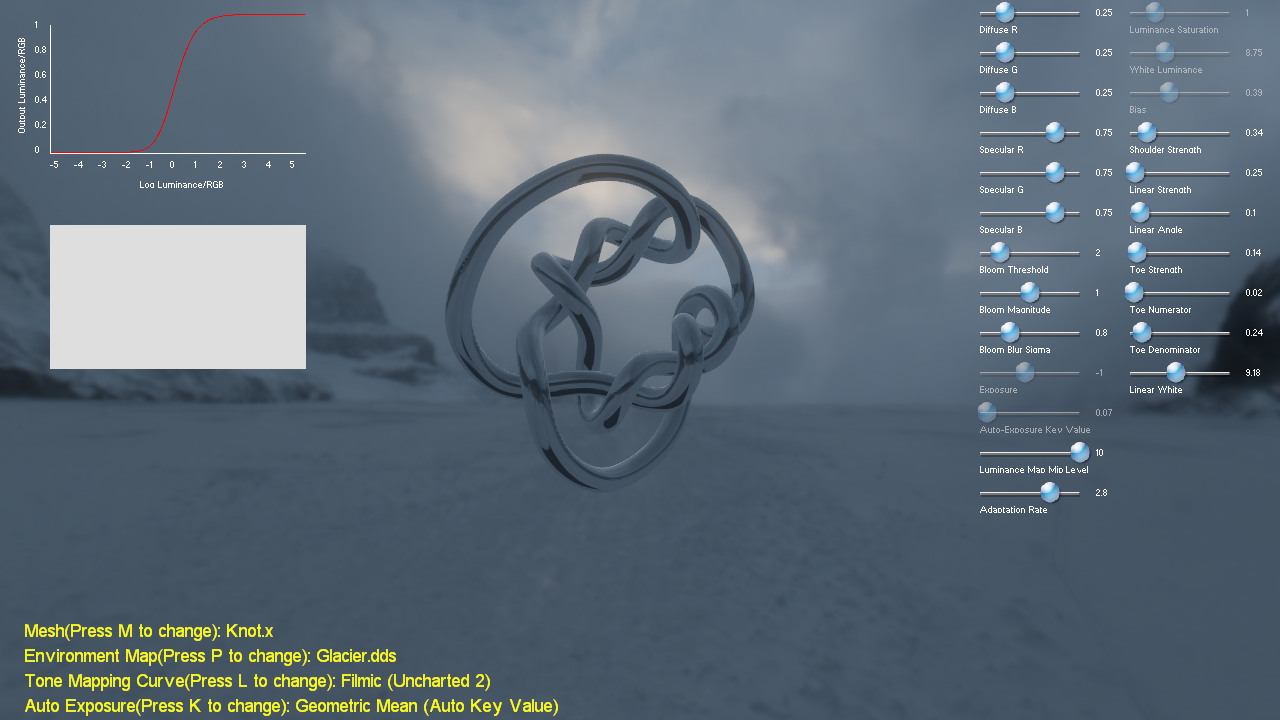
- Uncharted 2 (customizable filmic curve)
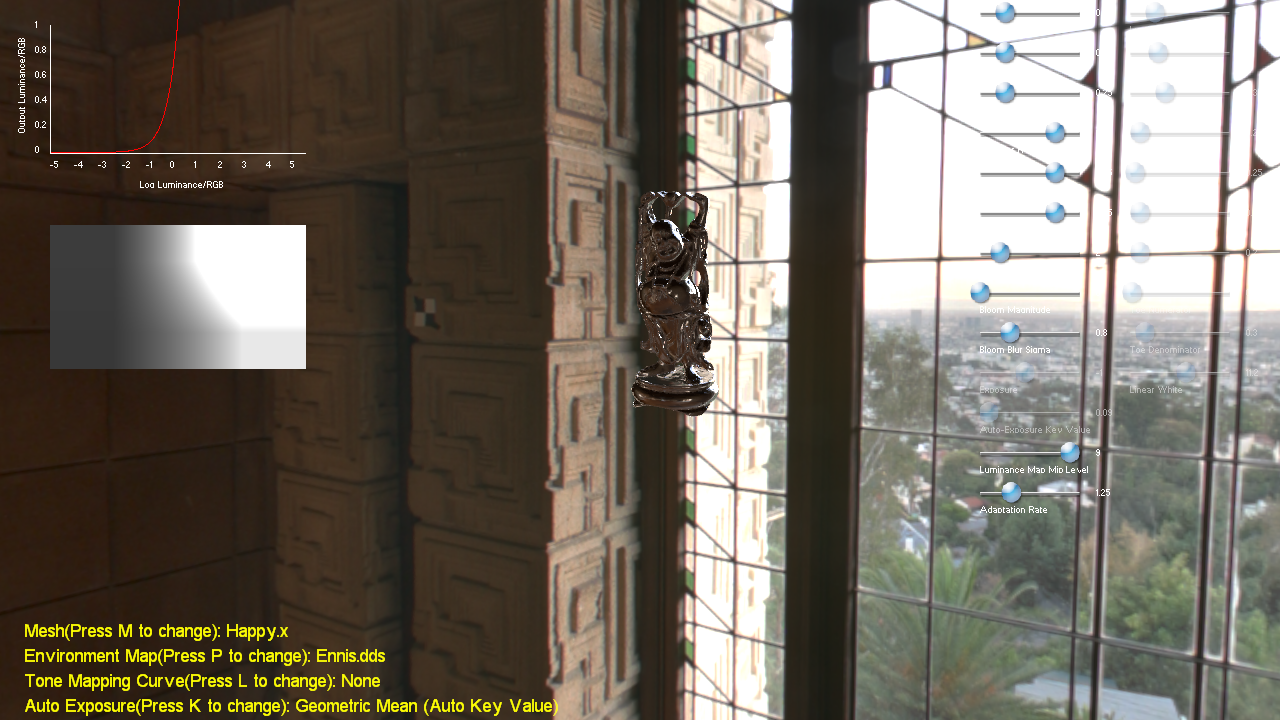
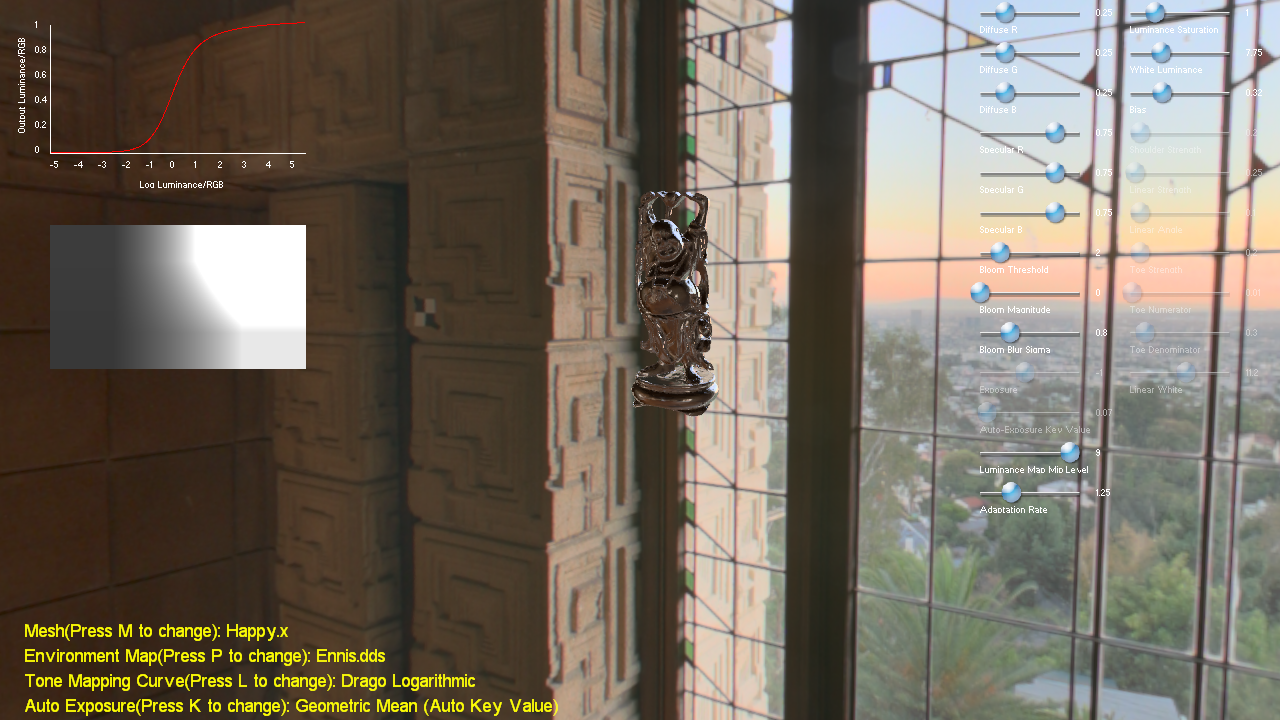
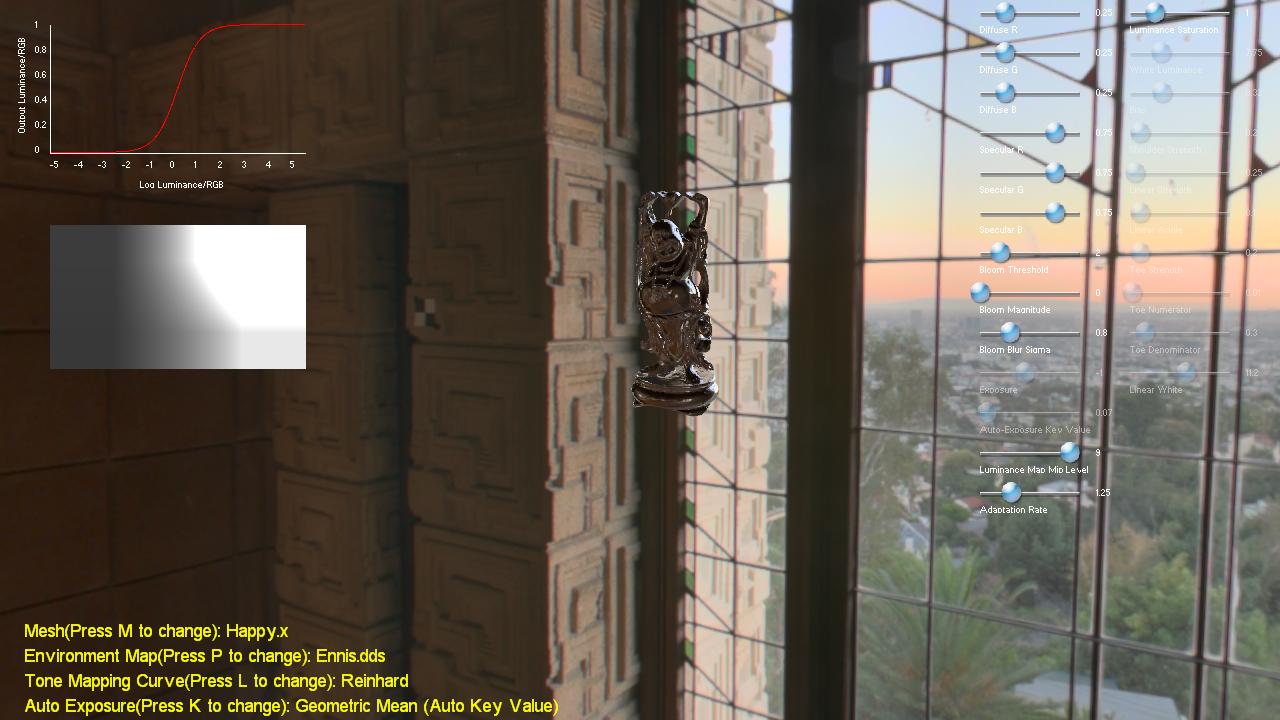
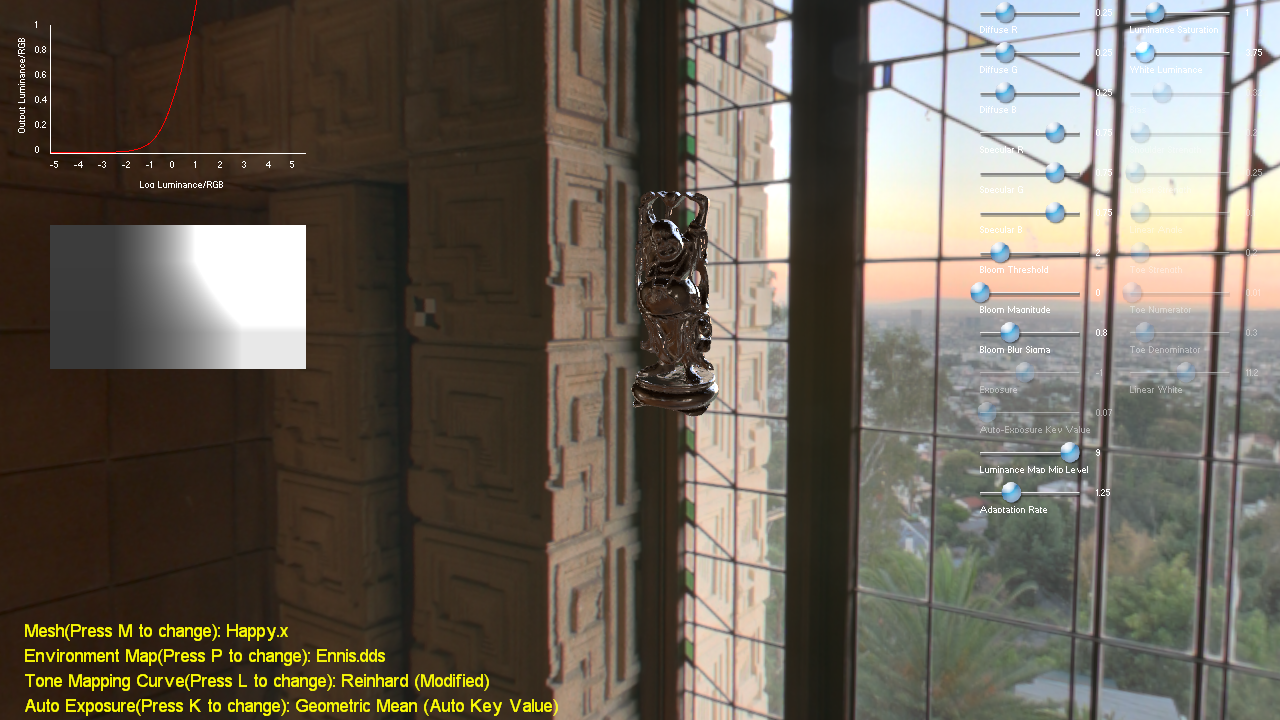
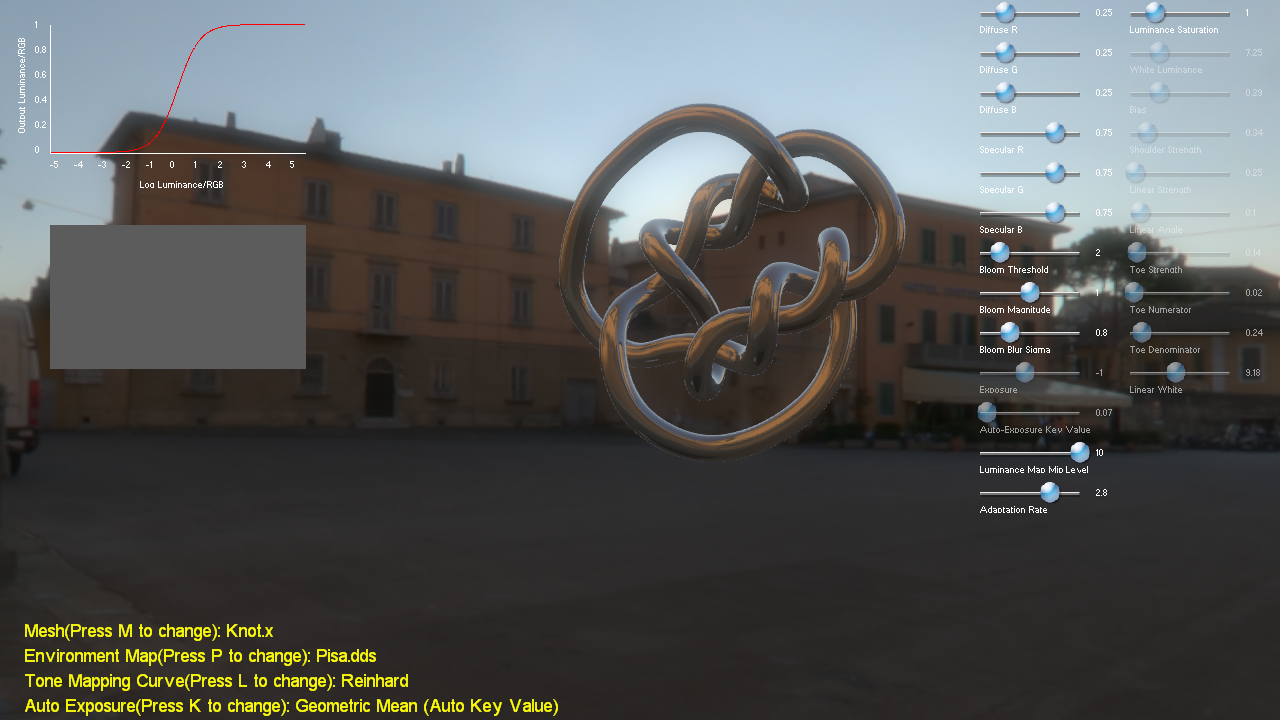
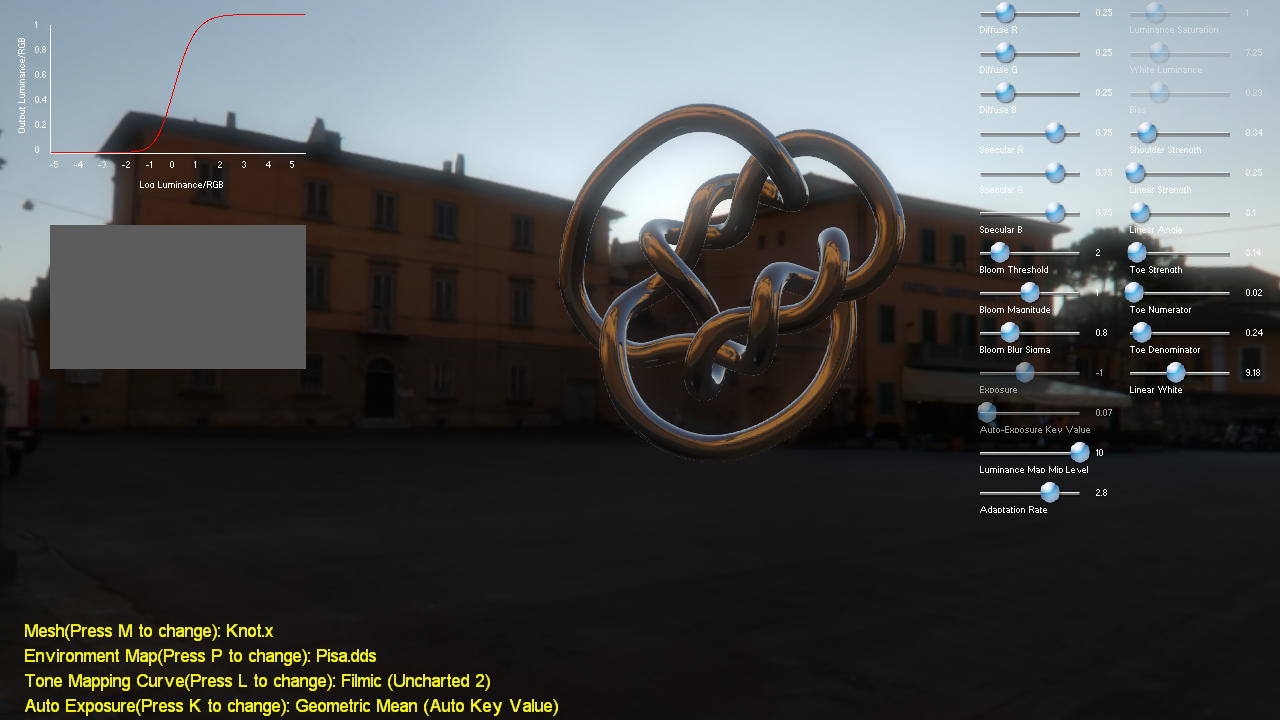
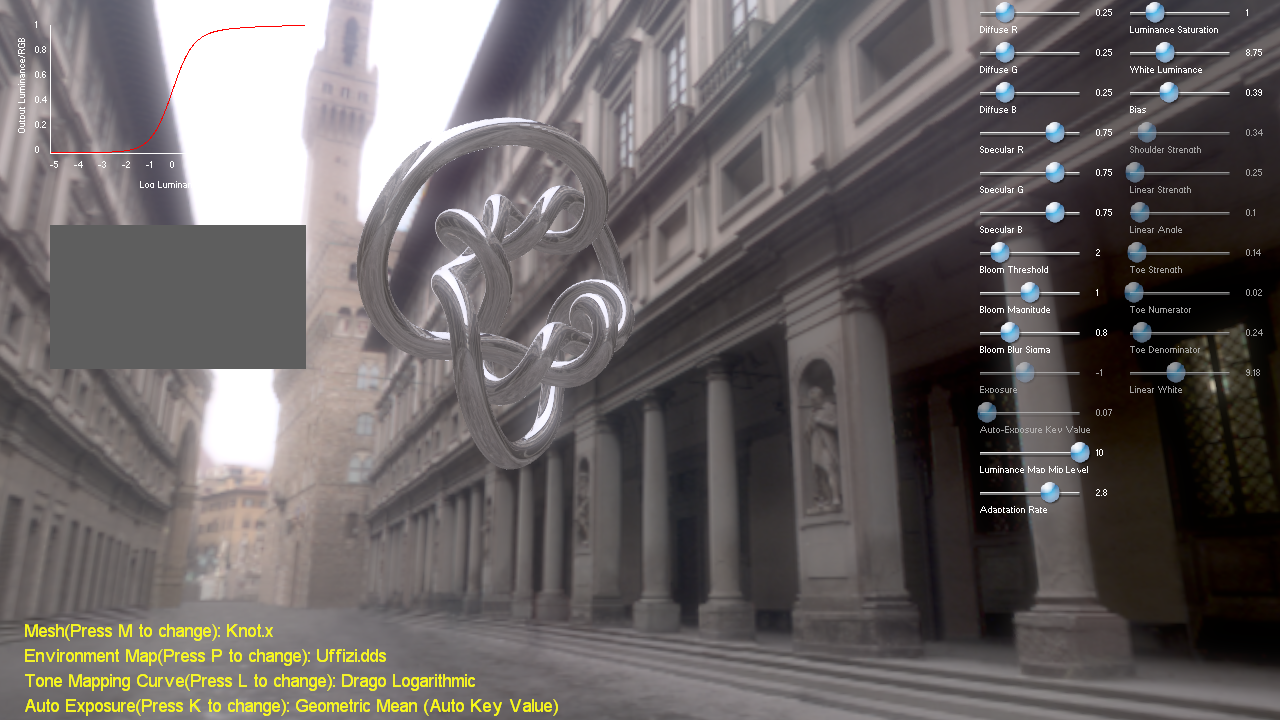
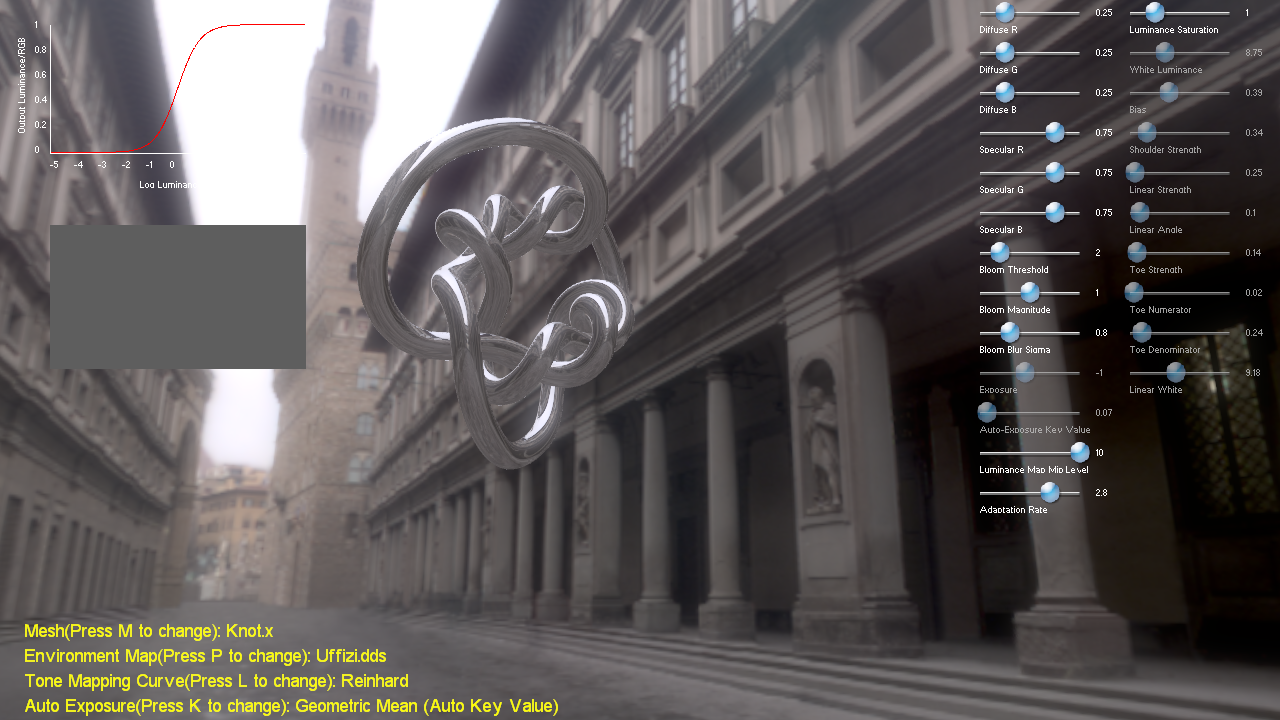
Now for the exciting part: pictures! For this first set of shots, I used an an HDR environment map taken from the Ennis House. I liked this map because it gave a great test case for detail preservation: a mostly-dark room, with an extremely bright window through which a landscape is visible. For reference, this is what the shot looks like with no exposure or tone mapping applied:
Here’s what the shot looks like for each tone mapping curve, with “auto-exposure” applied using a global geometric mean:
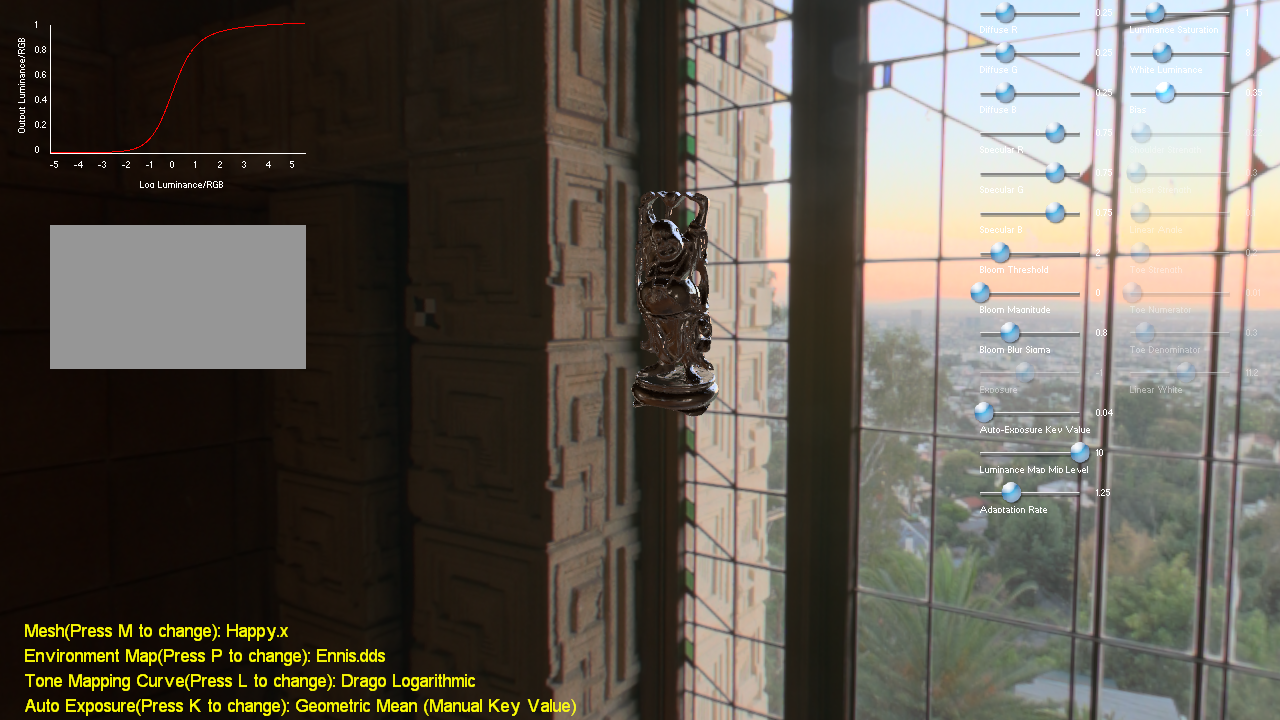
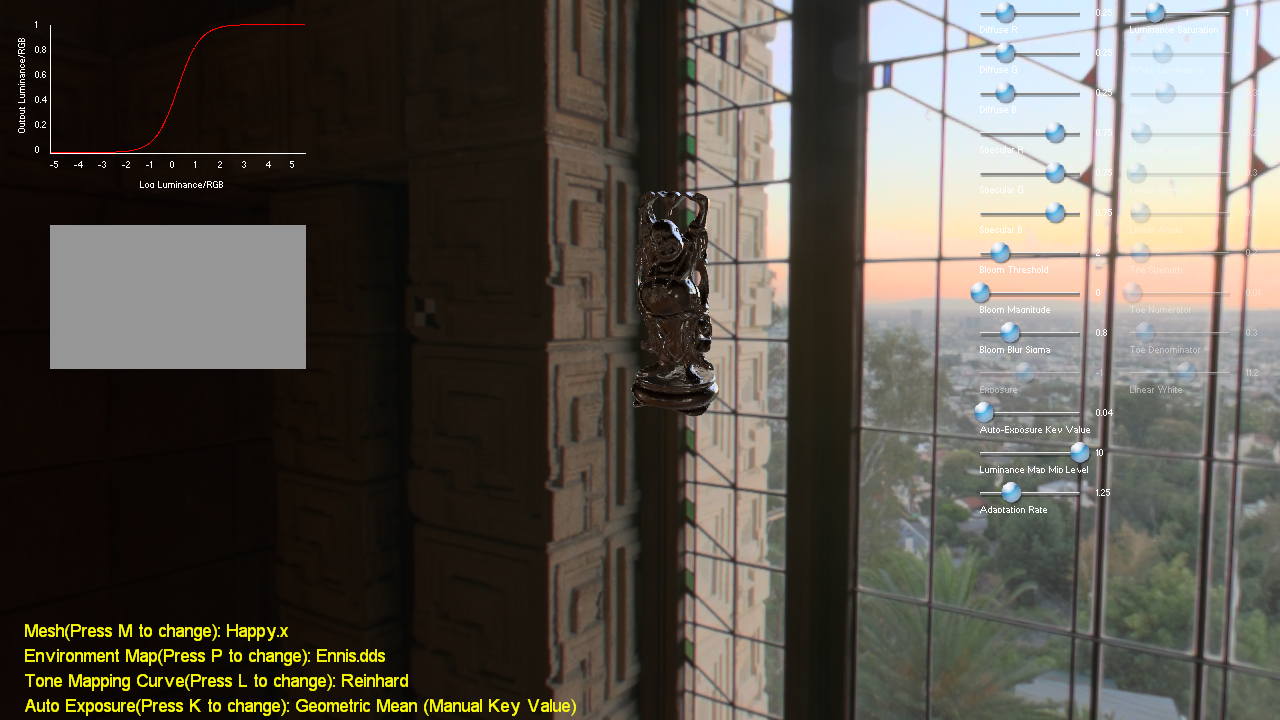

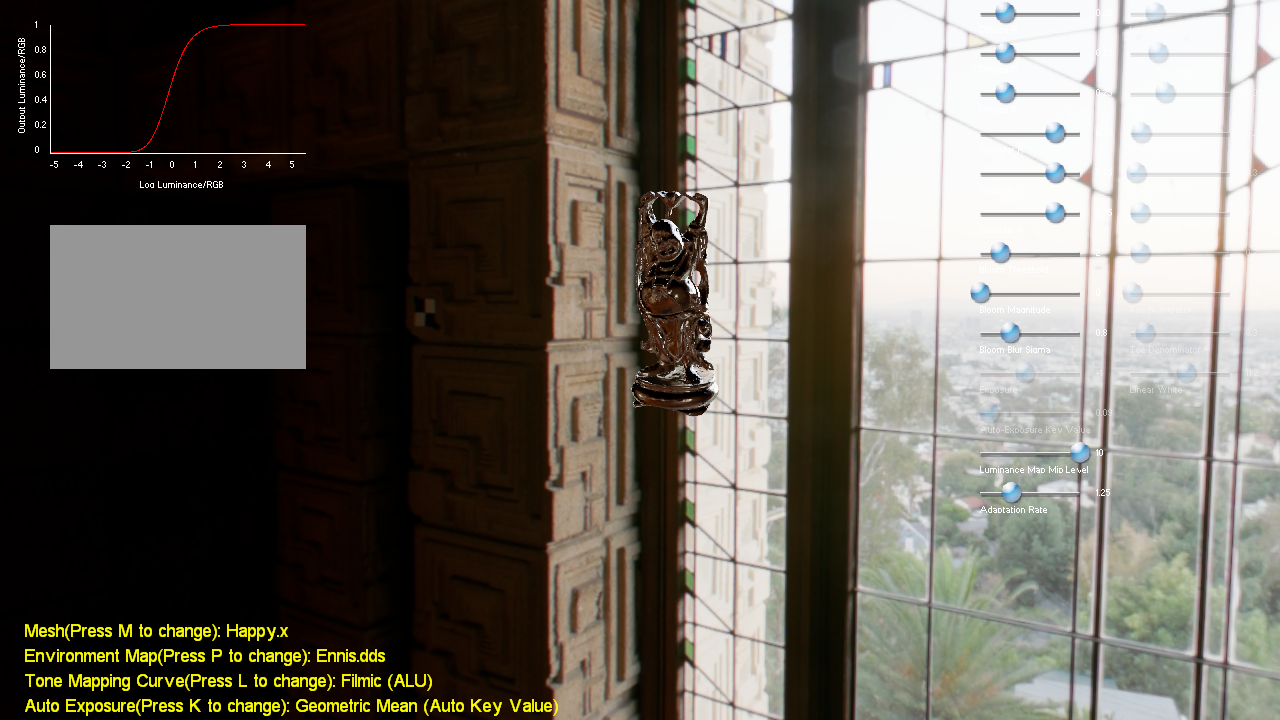
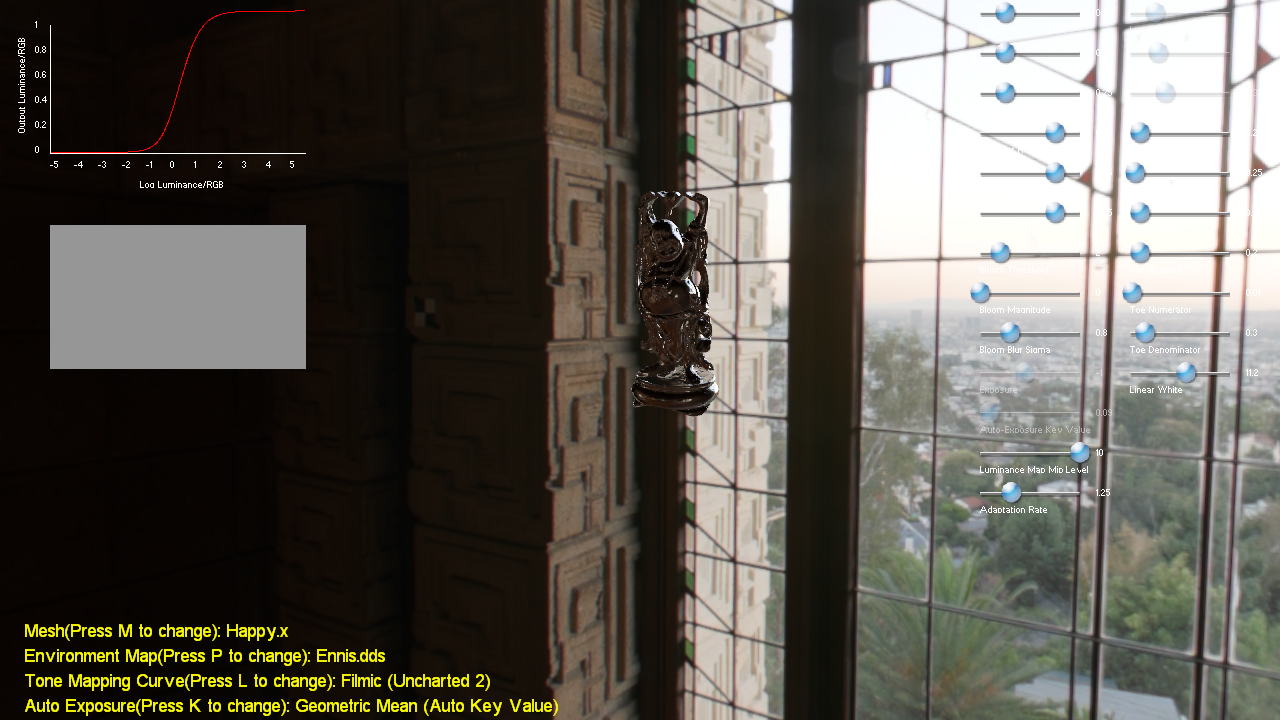
Both Drago and Reinhard look pretty decent in this case, while with filmic you pretty much lose everything in the darks and in the brights. The Uncharted 2 curve doesn’t have such a strong toe so the blacks aren’t crushed, and the contrast is a bit better than in Reinhard. But you do lose the coloring in the sky with both filmic curves, since those curves are applied to the RGB channels which means color ratios aren’t preserved like they are when you tone map luminance. However I think the sky looks rather unnatural in Drago and Reinhard, despite the colors being preserved.
For this next set, I sampled the 9th mip level which essentially gives you a 2x2 grid of local luminance averages. This essentially applies a higher exposure to the left portion of the image, and lower exposure to the right portion.


Using local averages works pretty well for the filmic techniques. Areas that used to be underexposed or overexposed now clearly show more detail, and the overall the image has a nice level of contrast and saturation. Reinhard and Drago, on the other hand, look more washed-put than they did previously.
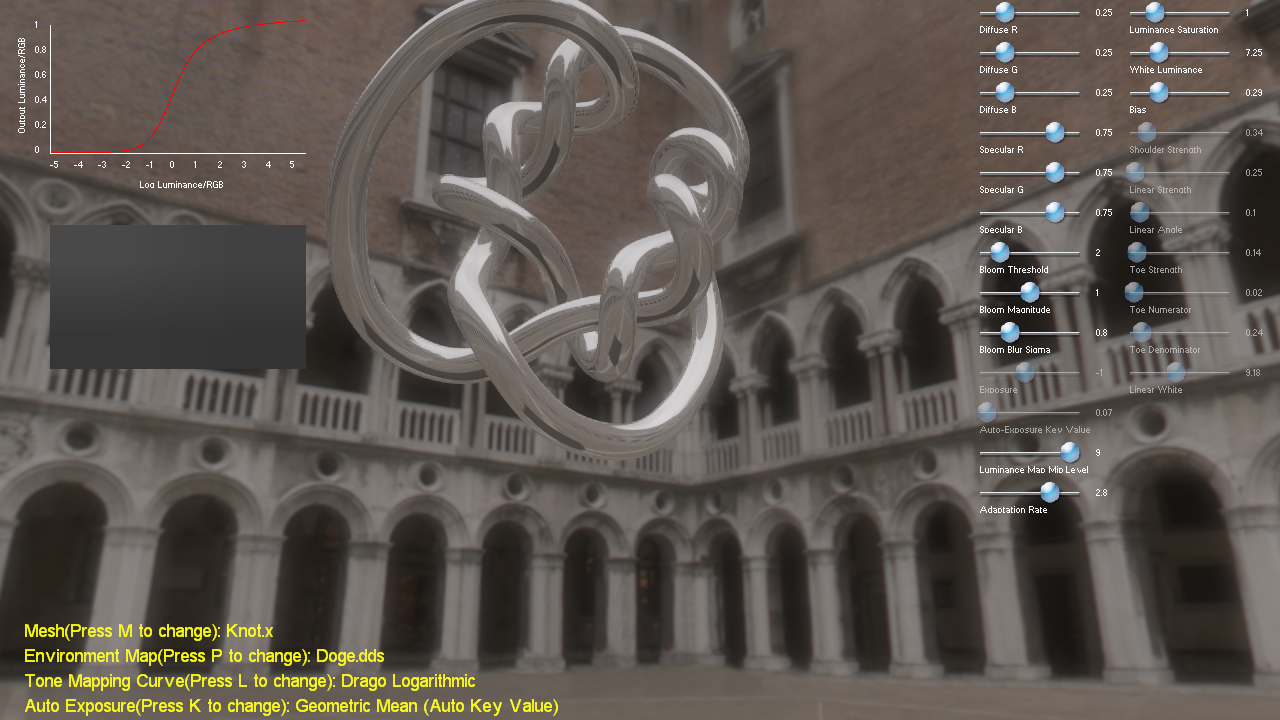
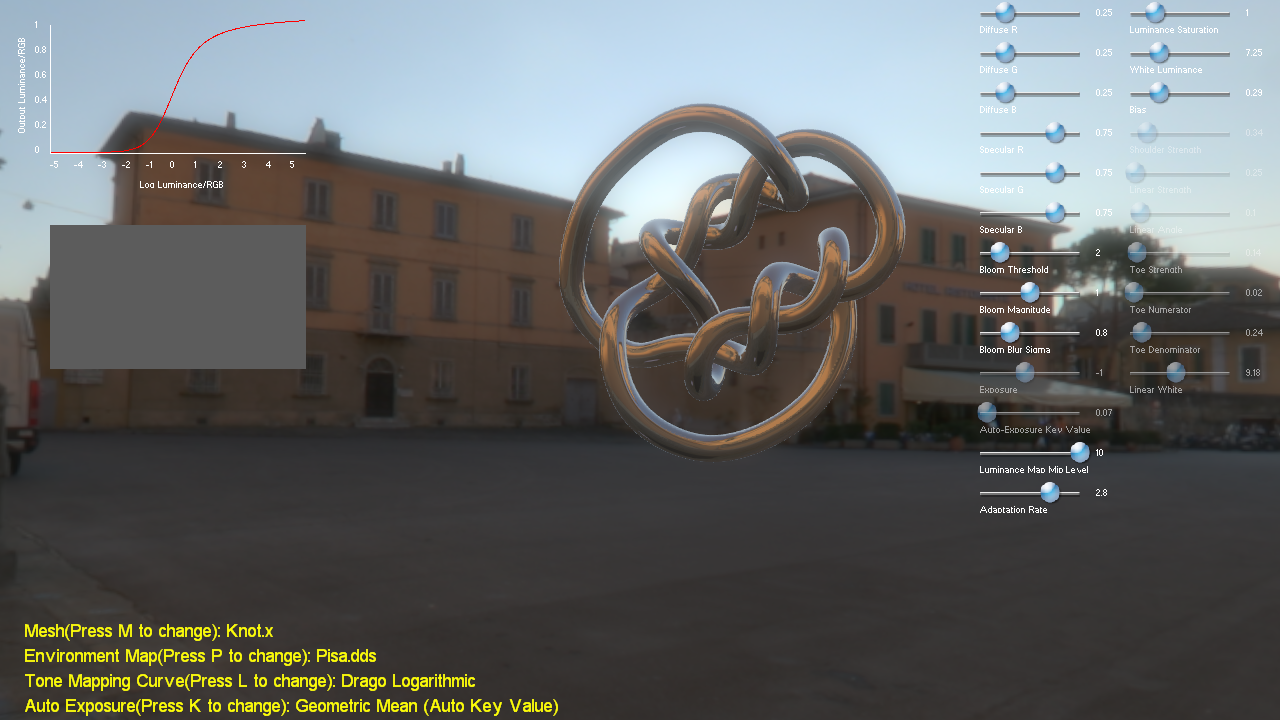
Here’s some other assorted screenshots I took using other environment maps, and with bloom enabled:


Overall I like the look of the filmic curves. It might just be that I watch too many movies and I’m used to that kind of look, but I just think the image looks more natural. I’m sure plenty of people would disagree with me though, especially since Reinhard and Drago are much better at preserving details across a wide range of intensities.
If you’d like to play around with the app itself, I’ve uploaded the code, content, binaries, and VS2010 project here:
ToneMapping.part01.rar ToneMapping.part02.rar ToneMapping.part03.rar
Sorry about it being in 3 parts…together they total 174MB and SkyDrive has a 50MB limit per file. If you’re wondering why the app is so big, it’s because I ran the HDR environment maps through ATI’s CubeMapGen to generate some really nice mipmaps (it does proper angular extent filtering so that there’s no seams in lower mip levels) and that app can only save HDR cube maps in uncompressed floating point formats. But on the upside they have really nice mips…in fact I use a low mip level for faking diffuse lighting on the mesh.
Comments:
For games, the goal is not academic “tone mapping” (preserve as much detail as possible) but rather “image rendition”; to get an output image that evokes a similar or creatively enhanced perceptual response as the original scene would in an observer, for the salient details. For film “salient details” and “similar” are in the eyes of the cinematographer; “creatively enhanced” is defined by the cinematographer and director. In games these roles are played by the lighting artist and art director. The S-shaped tone curve of film stock has been carefully engineered over almost two centuries (!) to achieve this result (in combination with appropriate lighting); games could do far worse than to model their image rendition on film.
#### [John Hable](http://filmicgames.com "") -
Nice post! I like the trick of multiplying by the 2x2 mipmap level. For your Reinhard, I assume you are converting RGB to HSL, applying Reinhard to luminance, and converting back to RGB. It’s great to see a good discussion about tonemapping. My take is that I don’t care which one you use as long as you have a good reason for doing it.
#### [Rim](http://xnainfo.com "") -
> However I think the sky looks rather unnatural in Drago > and Reinhard, despite the colors being preserved. It’s all subjective of course, but I actually do like the effect. The sky colors aren’t that pronounced when you naturally focus on the statue, but when ’looking out the window’ seeing the colorful sky gives a sense of depth filmic seems to lack. Overall though I do like the crisp look of filmic better. I’d wish I’d have something useful to contribute technically, but alas I only have my opinion to share :)
#### [Brad Roepstorff]( "tostador@gmail.com") -
Just worked on this very thing a few weeks back. Yeah, the differences between these curves (at least for games) can be subtle and very scene dependent. And the “quality” is definitely subjective. And it’s kind of a wash if you apply some form of artist-driven color correction to the image after the HDR tone mapping (e.g. http://http.developer.nvidia.com/GPUGems/gpugems_ch22.html). We were left kind of scratching our heads which was the best, so in the end we just went with whatever was fastest (a cheap polynomial approximation to Hable’s filmic curve), and let the artists tweak saturation and contrast manually via photoshop color curves.
#### [-]( "") -
@Naty, I don’t understand why you wouldn’t want to try and preserve as much detail as possible? I would imagine this is the direction you want to go, 1) Simulate radiance in a scene. 2) Tone map the radiance to give the most similar representation of the human visual system. This includes preserving details, and retaining correct contrast ratios. 3) Finally, allow the art director/lighting artist to tweak the contrast ratios, saturation levels, smash the darks, blow out the whites, change the hue, etc… The last step is where the creativity comes in to play and can define the artistic look for the game. The S-shaped tone curve was engineered under the limitations that cameras couldn’t record high dynamic ranges. Modern cameras are just beginning to record higher ranges in brightness and I suspect these ‘academic’ methods will be incorporated into modern film. Games dynamic range is only limited by the encoding methods of our textures, back buffer, and bandwidth.
#### [defaultex](http://defaultex.wordpress.com "default_ex@live.com") -
Thanks for putting in the work on showing all three under such controlled situation. I’ve been trying to decide which method I liked enough to implement, while I still haven’t decided fully I do really like that adjustable filmic curve, I could see artist having fun with it an churning out some really pretty scenes.
#### [Blog added – The Danger Zone « GameDevBlogs](http://www.gamedevblogs.net/2010/07/blog-added-the-danger-zone/ "") -
[…] blogs, the site is heavy on tutorials and samples, and has some very in-depth articles (such as this one about tone mapping), so it will no doubt prove very useful to people interested in that […]
#### [Balkan Forest](http://balkanforest.com "contact@balkanforest.com") -
Nice post, very good information, thanks.
#### [Ruud van Gaal](http://www.racer.nl "ruud@racer.nl") -
Interesting. I did my own downsampling and it turned out to be slightly faster than using glGenerateMipmap(). Haven’t touched too many tonemapping tuning yet though; such a world of lighting info to read up on…
#### [José Schneider](http://www.facebook.com/jischneider "jischneider@hotmail.com") -
I want to improve the tau value calculation to contemplate rod and cones adaptation velocity. http://www.mpi-inf.mpg.de/resources/hdr/peffects/krawczyk05sccg.pdf said that a value of 0.4 sec for rods and 0.1 sec for cones are good values. But knowing the proportion of the two values using a non-calibrated average luminance is tricky. Rods work between 10^-6 and 10^1 cd/m2 and cones work between 10^-1 and 10^8 cd/m2. But, what is the estimated unit of the average luminance? I’m not talking about a precise conversion, it is almost impossible without calibrated data and physical correct materials. But what you will do? Using a slider to control the range? or directly assuming that an average luminance value of 1 equals… x candelas?
#### [José Schneider](http://www.facebook.com/jischneider "jischneider@hotmail.com") -
Matt, I think I find an error in the Drago operator. You write: toneMappedLuminance /= log10(2 + 8 * ((pixelLuminance / WhiteLevel) * log10(Bias) / log10(0.5f))); But it has to be: toneMappedLuminance /= log10(2 + 8 * (pow((pixelLuminance / WhiteLevel), log10(Bias) / log10(0.5f)))); Because the Perlin and Hoffert’s bias function is defined as: biasp(x) = pow(x, log(p)/ log(0.5)) Any ideas about my previous question?
#### [Remko]( "remko@act-3d.com") -
You’re right! It’s the strange order of operators that threw me off. The local adaptation does not really work that well because it just ends up as ghosting. Maybe it can work for scenes without moving objects. I wonder if it is even possible to have slowly adapting local exposures. Probably it will always end in ghosting. A single exposure value for the entire screen seems to work best. Another nice addition to the curves you tried might be actual real-world curves. I looked up some film curves from Kodakchrome 25 and other film types and approximated their curves with a polynomal. The process is really simple. I just used an online least squares approximations utility to convert tables of values to functions. Of course the easiest way is to use a lookup texture. Actual film curves do not only change the luminance but they also add some style because they warp the colors.
#### [Remko]( "remko@act-3d.com") -
There’s a small error in the code. Log10 is used to generate the average log of the image. To get back to a value exp() is used which has a base of e and not 10. It does not matter which base you use as long as the are the same: you can: use log10(x) for downsampling and pow(10,x) to get the geometric mean or: use log(x) for downsampling and exp(x) to get the geometric mean
#### [MJP](http://mynameismjp.wordpress.com/ "mpettineo@gmail.com") -
Hi Remko, The sample doesn’t use log10 for computing the geometric mean. The log is performed at the end of the “AdaptLuminance” pixel shader, which adapts the luminance value based on the luminance of the previous frame. Usually you do the adaptation after you’ve finished computing the geometric mean, but for this sample I did the adaptation first at full resolution so I could try out my wacky idea of using localized geometric means for adaptive auto-exposure. In all of my other samples I do it the “normal” way and immediately take the log of luminance right when I calculate it per-pixel. The only log10’s in the shader code are either in tone mapping operators (logarithmic and Drago logarithmic), or in the bit of code that attempts to guess at a good key value to use for auto exposure.
#### [Readings on color management | Light is beautiful](http://lousodrome.net/blog/light/2012/09/11/readings-on-color-management/ "") -
[…] A Closer Look At Tone Mapping: another follow up, where the author makes various tone mapping experiments (also find more links there). […]
#### [SteveM]( "steve.marton@gmail.com") -
Thanks for such an excellent and insanely thorough article! Whoever is not doing some sort of nonlinear tone mapping is just shooting themselves in the foot and missing out ;) Here’s my super simple curve. float a = 10.0; /// Mid float b = 0.3; /// Toe float c = 0.5; /// Shoulder float d = 1.5; /// Mid return (x * (a * x + b)) / (x * (a * x + c) + d); Essentially it’s John Hable’s curve, but I wanted to remove the extraneous pow 2.2, and I wanted my whites to get white faster. Snow looked grey without it, and in general things were a bit less saturated than I liked. Put some sliders on those parameters and got exactly what I wanted. Whites are white, highlights are still very well controlled, little more contrast, little darker toe. The point is that it’s a very powerful function, and you can get pretty much anything you want out of it. Try it. One more thing. I thought I would want to do tone mapping on luminance instead of individual color channels, and then I realized that’s wrong, film/cameras apply the tone curve to the channels individually. You get a much more natural look, as MJP alluded.
#### [SteveM]( "steel_3d@hotmail.com") -
Here’s another useful curve to try: float a = 1.8; /// Mid float b = 1.4; /// Toe float c = 0.5; /// Shoulder float d = 1.5; /// Mid return (col * (a * col + b)) * rcp(col * (a * col + c) + d); It’s essentially linear - it only modifies the shoulder region and drastically improves highlight clipping. Doesn’t modify the overall contrast or brightness, and it especially doesn’t crush the darks in the toe region. My artists currently prefer this linear look, which better matches other content creation packages for baseline preview. Extra contrast and saturation can always be added later under artistic control (ie: color grading).
#### [Readings on Physically Based Rendering | Interplay of Light](http://interplayoflight.wordpress.com/2013/12/30/readings-on-physically-based-rendering/ "") -
[…] A Closer Look At Tone Mapping, Matt Pettineo provides a showcase of popular tonemapping operators with sample code. […]
#### [Cleaning up the HDR pipeline | IceFall Games](http://mtnphil.wordpress.com/2014/04/30/cleaning-up-the-hdr-pipeline/ "") -
[…] I also implemented the filmic tone-mapping described here. I think it does look a little better than Reinhard (more “punchy”). There is a lot more information here too. […]
#### [HDR Rendering – Tonemapping and Bloom | Chetan Jags](https://chetanjags.wordpress.com/2015/06/28/hdr-rendering-tonemapping-and-bloom/ "") -
[…] https://mynameismjp.wordpress.com/2010/04/30/a-closer-look-at-tone-mapping/ […]
#### [Ciro Cardoso]( "cirocardoso@yahoo.co.uk") -
How can we implement these curves in something like Fusion? I already have script to create a Filmic Tonemapping, but I would love to play with the other curves.
#### [MJP](http://mynameismjp.wordpress.com/ "mpettineo@gmail.com") -
Hi Ciro, Unfortunately I’m not at all familiar with Fusion, so I don’t know how to implement arbitrary tone mapping curves in that program. -Matt
#### [Ciro Cardoso]( "cirocardoso@yahoo.co.uk") -
Hi MJP, Thanks for the quick reply. Basically, I am trying to translate those curves (Log Luminance/RGB/ Output Luminance/RGB) to curves that you can find in Photoshop for example. But, I don’t understand how can I translate for example the Log Luminance/RGB to a curve. Maybe I can’t??
#### [Designing A Linear HDR Pipeline | kosmonaut games](https://kosmonautblog.wordpress.com/2017/03/26/designing-a-linear-hdr-pipeline/ "") -
[…] A great resource for tonemapping is, again, MJP’s blog. Highly recommended:https://mynameismjp.wordpress.com/2010/04/30/a-closer-look-at-tone-mapping/ […]
#### [Todo sobre HDR el resumen – El tesoro del saber retro](https://tesorodelsaberretro.wordpress.com/2016/09/10/todo-sobre-hdr-el-resumen/ "") -
[…] https://mynameismjp.wordpress.com/2010/04/30/a-closer-look-at-tone-mapping/ […]