Experimenting with Reconstruction Filters for MSAA Resolve
Previous article in the series: A Quick Overview of MSAA
Update 8/26/2017: while working on The Order I improved upon the work described here, which I presented at SIGGRAPH 2015. I also created an updated MSAA + TAA filtering demo that you can find on GitHub, which just about completely supersedes the demo that’s linked at the end of the article. So make sure that you look at the new one as well!
Despite having the flexibility to implement a custom resolve for MSAA, the “standard” box filter resolve is still commonly used in games. While the box filter works well enough, it has some characteristics that can be considered undesirable for a reconstruction filter. In particular, the box function has a discontinuity at its edge that results in an infinite frequency response (the frequency domain equivalent of a box function is the sinc function). This causes it to introduce postaliasing when used as a reconstruction filter, since the filter is unable to isolate the original copy of a signal’s spectrum. The primary advantage offered by such a resolve is that it’s cheap from a performance point of view, since only subsamples within a single pixel need to be considered when computing a resolved pixel value.
The question we now want to answer is “can we do better?” Offline renderers such as Pixar’s PRMan support a variety of filter types for antialiasing, so it stands to reason that we should at least explore the possibilities for real-time graphics. If we decide to forego the “standard” resolve offered by ResolveSubresource and instead perform our own resolve using a pixel or compute shader that that accesses the raw multisampled texture data, we are pretty much free to implement whatever reconstruction filter we’d like. So there is certainly no concern over lack of flexibility. Performance, however, is still an issue. Every GPU that I’ve run my code on will perform worse with a custom resolve, even when using a simple box filter with results that exactly match a standard resolve. Currently the performance delta seems to be worse on AMD hardware as opposed to Nvidia hardware. On top of that, there’s additional costs for the increased texture samples required for wider filter kernels. Separable filtering can be used to reduce the number of samples required for wide filters, however you must have special considerations with the rotated grid sample patterns used by MSAA. Unfortunately I haven’t solved these problems yet, so for this sample I’m just going to focus on quality without too much regard for performance. Hopefully in a future article I can revisit this, and address the performance issues.
At this point I feel that I should bring up TXAA. If you’re not familiar, TXAA is a library-supported antialiasing technique introduced for recent Nvidia Kepler-based GPU’s. There’s no public documentation as to exactly how it works, but Timothy Lottes has mentioned a few details here and there on his blog. From the info he’s given, it seems safe to assume that the MSAA resolve used by TXAA is something other than a box filter, and is using a filter width wider than a pixel. Based on these assumptions, you should be able to produce similar results with the framework that I’ve set up.
Implementation
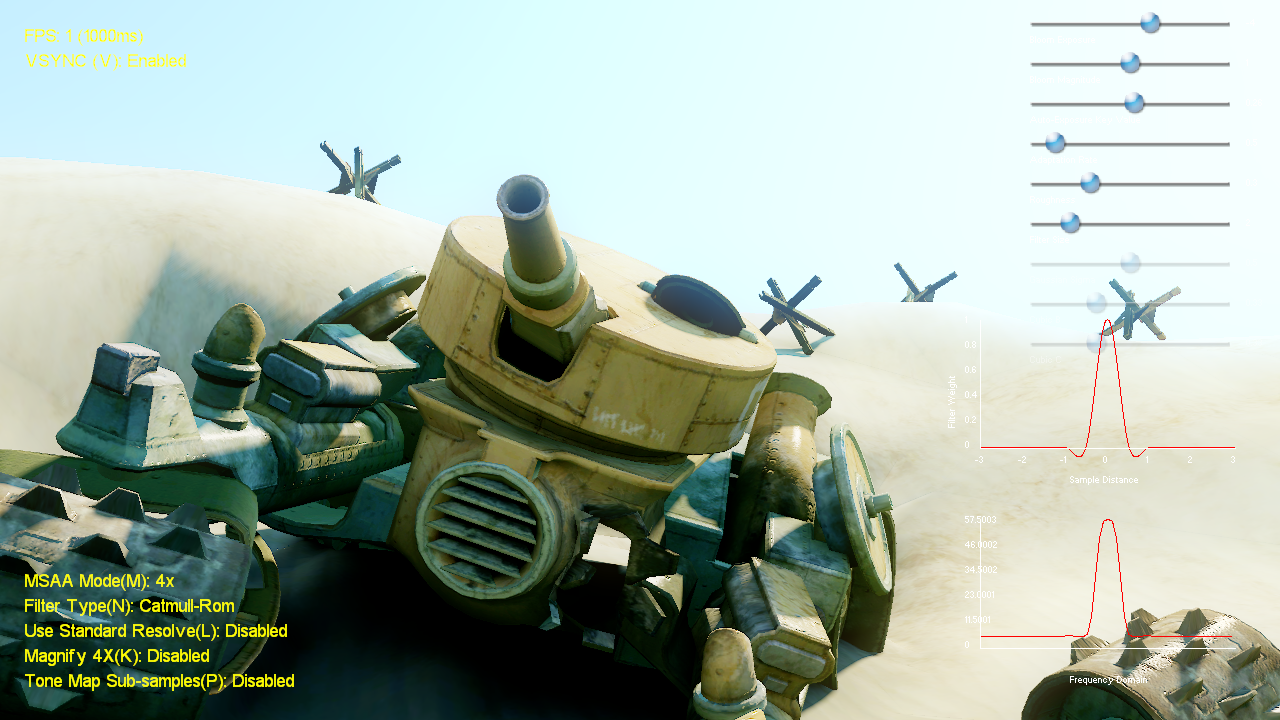
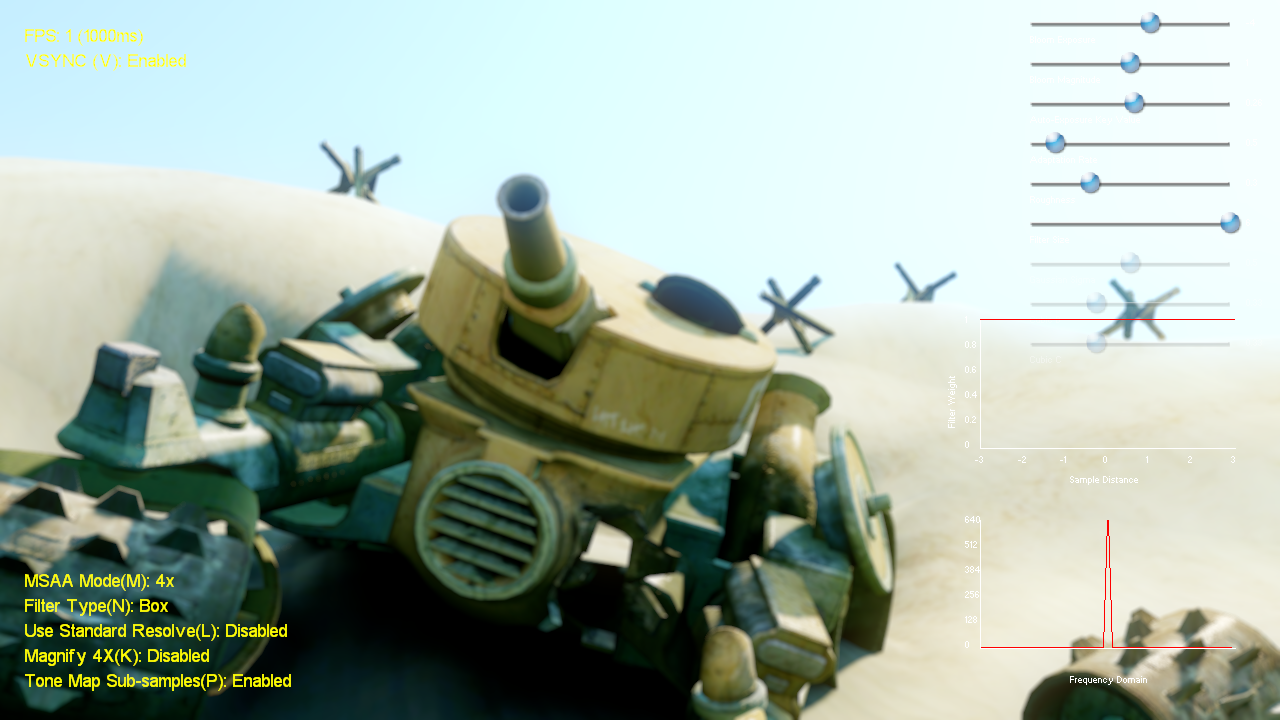
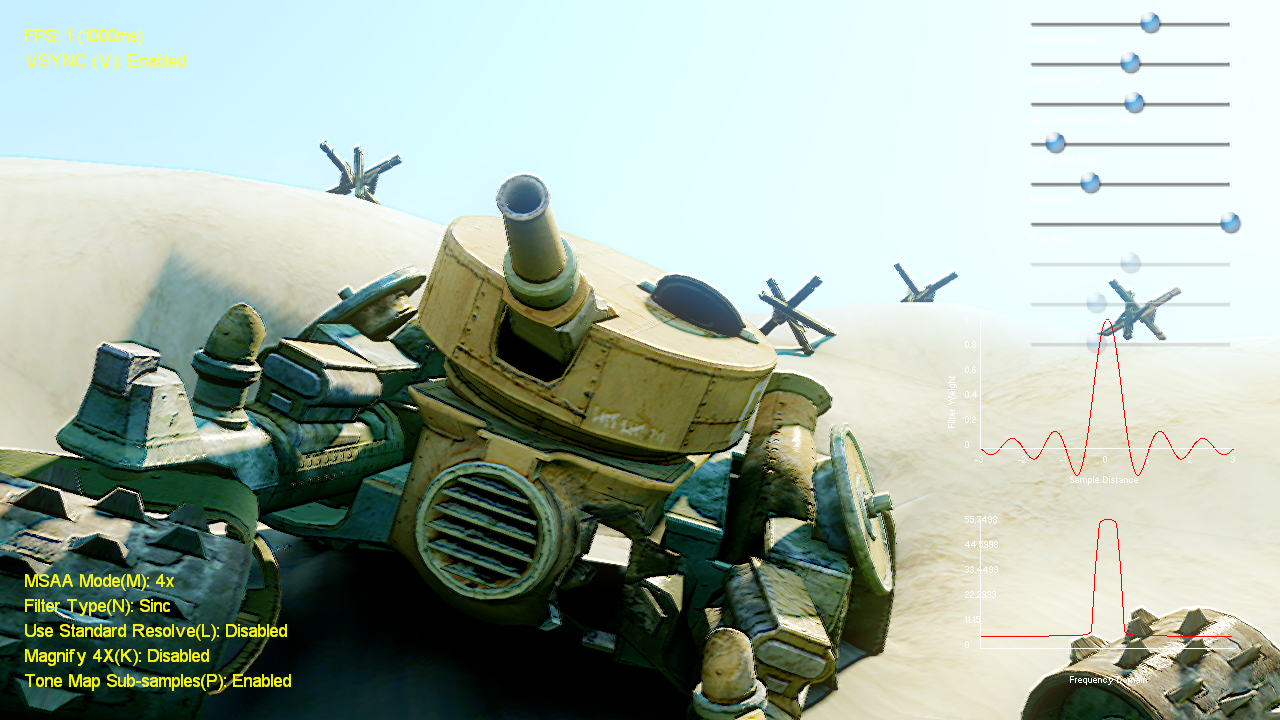
The sample application renders my trusty tank scene in HDR to an fp16 render target with either 1x, 2x, 4x, or 8x MSAA enabled. Once the scene is rendered, a pixel shader is used to resolve the MSAA render target to a non-MSAA render target with one of ten available reconstruction filters. I implemented the following filters:
| Box |  |
| Triangle |  |
| Gaussian |  |
| Blackman-Harris |  |
| Smoothstep (Hermite spline) |  |
| B-spline |  |
| Catmull-Rom |  |
| Mitchell |  |
| Generalized Cubic |  |
| Sinc |  |
I started out by implementing some of the filters supported by PRMan, and using similar parameters for controlling the filtering. However I ended up deviating from the PRMan setup in order to make things more intuitive (in my opinion, at least). All filters except for the sinc filter were implemented such that their “natural range” of non-zero values were in the [-0.5, 0.5] range. This deviates from the canonical filter widths for several of these filters, notably the cubic filters (which are normally defined for the [-2, 2] range). I then used a “filter width” parameter to inversely scale the inputs to the filtering functions. So for a filter width of 1.0, the filters all have a width equal to the size of a single resolved pixel. The one exception is the sinc filter, where I used the filter width to window the function rather than scaling the input value. I should also note that I implemented all of the filters as radial filters where the input is the screen-space distance from the output pixel center to the sample position. Typically filters for image scaling are used in separable passes where 1D filters are passed the X or Y sample distance. Because of this my “Box” filter is actually disc-shaped, but it produces very similar results. In fact for a filter width of 1.0 the results are identical to a “standard” box filter resolve. The “Triangle” filter uses a standard triangle function,which can be considered a “cone” function when used as a radial filter. “Gaussian” uses a standard Gaussian function with a configurable sigma parameter, with the result windowed to [-0.5, 0.5]. The “Smoothstep” filter simply uses the smoothstep intrinsic available in HLSL, which implements a cubic hermite spline. The “Generalized Cubic” filter is an implementation of the cubic function suggested by Mitchell and Netravali in their paper, with the B and C parameters being tweakable by the user. The “B-spline”, “Mitchell” and “Catmull-Rom” filters use this same function except with fixed values for B and C. “Sinc” is the standard sinc function, windowed to [-FilterWidth, FilterWidth] as mentioned previously.
To visualize the filtering function, I added a real-time 1D plot of the currently-selected filter function using the current filter width. I also added a plot of the 1D fourier transform of the filter function (calculated with the help if the awesomely easy-to-integrate Kiss FFT library), so that you can also visualize the frequency response of the selected filter type. This can be useful for estimating the amount of postaliasing produced by a filter, as well as the attenuation of frequencies below the Nyquist rate (which results in blurring).
After the resolve is performed, the result is fed into a standard post-processing chain. This phase includes average luminance calculation for auto-exposure, bloom, and HDR tone mapping. I added an option to tone map subsamples in a manner similar to Humus’s sample, so that the results can be compared to resolve prior to tone mapping. When this option is activated, the bloom and auto-exposure passes work with non-resolved MSAA textures since the output of the resolve no longer contains linear HDR values. Note that the resolve is still performed prior to post-processing, since I wanted to keep the resolve separate from the post-processing phase so that it was more visible. In production it would most likely be done after all post-processing, however you would still need the same considerations regarding working with non-resolved MSAA data.
Here’s a full list of all options that I implemented:
- MSAA Mode - the number of MSAA samples to use for the primary render target (1x, 2x, 4x, or 8x)
- Filter Type - the filtering function to use in the resolve step (supports all of the filters listed above)
- Use Standard Resolve - when enabled, a “standard” box filter resolve is performed using ResolveSubresource
- Tone Map Subsamples - when enabled, tone mapping is applied before the subsamples are resolved
- Enable FXAA - enables or disables FXAA with high-quality PC settings
- Render Triangle - renders a plain red triangle in the center of the screen
- Bloom Exposure - an exposure (in log2 space) applied to HDR values in order to create the bloom source values
- Bloom Magnitude - a multiplier for the bloom value that’s combined with the tone mapped result
- Auto-Exposure Key Value - key value for controlling auto-exposure
- Adaptation Rate - rate at which exposure is adapted over time
- Roughness - roughness used for material specular calculations
- Filter Size - the radius of the filter kernel (in pixels) used during the resolve step
- Gaussian Sigma - the sigma parameter for the Gaussian function, used by the Gaussian filter mode
- Cubic B - the “B” parameter to Mitchell’s generalized cubic function, used by the Generalized Cubic filter mode
- Cubic C - the “C” parameter to Mitchell’s generalized cubic function, used by the Generalized Cubic filter mode
- Magnification - magnification level for the final output (magnification is performed with point filtering)
- Triangle Rotation Speed - the speed at which the red triangle (enabled by Render Triangle) is rotated
Results
The following table contains links to 1280x720 screenshots from my sample application using various filter types and filter widths. All screenshots have use 4xMSAA, and perform the resolve in linear HDR space (bloom and tone mapping are performed after):
| Box | 1.0 | 2.0 | 3.0 | 4.0 | 5.0 | 6.0 |
| Triangle | 1.0 | 2.0 | 3.0 | 4.0 | 5.0 | 6.0 |
| Gaussian | 1.0 | 2.0 | 3.0 | 4.0 | 5.0 | 6.0 |
| Blackman-Harris | 1.0 | 2.0 | 3.0 | 4.0 | 5.0 | 6.0 |
| Smoothstep | 1.0 | 2.0 | 3.0 | 4.0 | 5.0 | 6.0 |
| B-spline | 1.0 | 2.0 | 3.0 | 4.0 | 5.0 | 6.0 |
| Catmull-Rom | 1.0 | 2.0 | 3.0 | 4.0 | 5.0 | 6.0 |
| Mitchell | 1.0 | 2.0 | 3.0 | 4.0 | 5.0 | 6.0 |
| Sinc | 1.0 | 2.0 | 3.0 | 4.0 | 5.0 | 6.0 |
This table contains similar screenshots, except that the tone mapping is performed prior to the resolve:
| Box | 1.0 | 2.0 | 3.0 | 4.0 | 5.0 | 6.0 |
| Triangle | 1.0 | 2.0 | 3.0 | 4.0 | 5.0 | 6.0 |
| Gaussian | 1.0 | 2.0 | 3.0 | 4.0 | 5.0 | 6.0 |
| Blackman-Harris | 1.0 | 2.0 | 3.0 | 4.0 | 5.0 | 6.0 |
| Smoothstep | 1.0 | 2.0 | 3.0 | 4.0 | 5.0 | 6.0 |
| B-spline | 1.0 | 2.0 | 3.0 | 4.0 | 5.0 | 6.0 |
| Catmull-Rom | 1.0 | 2.0 | 3.0 | 4.0 | 5.0 | 6.0 |
| Mitchell | 1.0 | 2.0 | 3.0 | 4.0 | 5.0 | 6.0 |
| Sinc | 1.0 | 2.0 | 3.0 | 4.0 | 5.0 | 6.0 |
As we take a close look at the images, the results shouldn’t be too surprising. For the most part, wider filter kernels tend to reduce aliasing while smaller filters preserve more high-frequency detail. Personally I find that the cubic spline filters with no negative lobes (smoothstep and B-Spline) will produce the best results, with the best balance between aliasing and blurring occurring around the 2.0-3.0 range. Here is a magnified image showing the results of 4xMSAA with a standard 1-pixel-wide box filter, followed by the same image with a 3-pixel-wide B-spline filter:


The appearance of aliasing is reduced on geometry edges with the B-spline filter, particularly edges with higher contrast. Here’s another pair of images that are magnified even further, so that you can see the edge quality:


Here’s another set of images showing the results of a wider filter kernel on high-frequency details from normal maps and specular lighting:


As you can see in the images, a 2-pixel-wide B-spline filter is actually pretty good in terms of not attenuating details that are close to a pixel in size. A wider filter reduces aliasing even further, but I feel that filter width of 2.0 is still an improvement over the quality offered by a “standard” resolve. So it’s probably a pretty good place to start if you want better quality, but you prefer a sharper output image. The other cubic filters with negative lobes (such as Catmull-Rom and Mitchell) will also produce a sharper result, however the negative lobe can produce undesirable artifacts if they’re too strong. This is especially true when filtering HDR values with high intensity, since they can have a strong effect on neighboring pixels. For this reason I think that Mitchell is a better option over Catmull-Rom, since Mitchell’s negative lobes are bit less pronounced. The sinc filter is almost totally unappealing for an MSAA resolve, since the ringing artifacts that it produces are very prominent. Here are three images comparing a 4-pixel-wide Catmull-Rom filter, a 4-pixel-wide Mitchell filter, and a 6-pixel-wide sinc filter:


All of the above images used 4xMSAA, but a wider filter kernel can also work well for 2xMSAA. Here’s some close-ups showing “normal” 2xMSAA vs. 2xMSAA with a B-spline filter vs. 4xMSAA with a B-spline filter:


To wrap things up, here a two close-ups showing the results of a wide B-spine filter applied before tone mapping, and the same image with tone mapping applied prior to filtering:


These results are little interesting since they illustrate the differences in the two different approaches. In the first image the filtering is performed with HDR values, so you get similar effects to applying DOF or motion blur in HDR where bright values can dominate their local neighborhood. The second image shows quite a different result, where the darker geometry actually ends up looking “thicker” against the bright blue sky. In general I don’t find that it produces a substantial improvement when you’re already using a wider filter kernel, or at least not enough to justify the extra effort and performance required to make it work with an HDR post-processing pipeline. However it does tend to play nicer with cubic filters that have negative lobes, since you’re not filtering HDR values with arbitrary intensity.
Conclusions
There are clearly a lot of options available to you if you choose to implement a custom MSAA resolve. I think there’s some good opportunities here to do an even better job at reducing aliasing in games, and personally I’m of the opinion that it’s worth reducing the appearance of tiny pixel-wide details if it results in an overall cleaner image. Either way I don’t think that a box filter is the best choice no matter what your tastes are.
If you want to download the sample app with source code, you can grab it here. Feel free to download it and perform your own experiments, although I’d appreciate if you’d share your results and opinions!
Some quick notes about the sample code: I decided to use the newer DirectX headers and libraries from the Windows 8 SDK, so you’ll need to have it installed if you want to compile the project. I haven’t fully migrated to VS 2012 yet, so I’ve left the project in VS 2010 format so that it can be opened by either. I also overhauled a lot of my sample framework code, which includes a shader caching system that uses the totally-awesome MurmurHash to detect when a shader needs to be re-compiled. Using the new SDK also entailed ditching D3DX, so I’ve replaced the texture and mesh loading functionality that I was using with some of my own code combined with some code lifted from DirectXTK. One major downside I should mention is that I’m only supporting x64 for now, due to some annoyances with the SDK and redistributing D3DCompiler DLL’s. If anybody is still stuck on 32-bit Windows and really wants to run the sample, let me know and I’ll try to find some time to get it working.
Comments:
Bryant -
@MJP This is really interesting work, It’s unfortunate that you can’t use shaders to do custom sample arrangements; it would be great to have access to the samples in order to set your own sample count and arrangement (jittered, poisson, etc). You included sinc in the test, have you done any further tests with windowed sinc functions? It would be interesting to see the effects of reconstruction with a sinc function using different windowing functions, particularly as the breadth of the kernel increases. You’ve said your kernels are symmetrical, I know the guys over at ImageMagick have added symmetrical kernels to their resampling with the -distort operator that makes use of elliptical weighted averaging. Have you had any discussions with them? Great articles as usual, it’s great talking to you guys from Beyond3D.
#### [Timothy Lottes](http://timothylottes.blogspot.com/ "timothylottes@gmail.com") -
Here is another trick I am using in my title. When correctly doing a linear HDR resolve, linear HDR post processing, then tonemapping to LDR right before scan-out (long after the resolve), bloom plays an important roll in removing any aliasing left over by extreme high dynamic range samples. Usually the tail section of the resolve filter kernel (the smallest coef) help in removing HDR aliasing, when this fails, using bloom to distribute the energy can remove (or rather hide) the remaining aliasing. In order to make the bloom pass fast, one can do an extremely low-cost 1/2x1/2 resolution down-sample during the resolve shader. Note the resolve kernels are radially symmetric. Taking 20 samples in a circle at 4xMSAA, there are 5 sets of 4 samples where each set has the same kernel weight. Taking the sum of samples in each set results in 5 new “ring” samples. It is fast to both compute the filtered resolve output (weight sum of the 5 “ring” samples), and the average of the 16 samples in a 2x2 pixel box centered on the pixel (average of 4 “ring” samples). Then use the standard pixel shader output to store the filtered resolve. And in the same pixel shader, use surface stores (imageStore() in GL) to write out the 2x2 pixel average to the 1/2x1/2 resolution target. Predicate the store to the upper-left pixel of each 2x2 pixel quad. Afterwards the 1/2x1/2 resolution target has the box filtered down-sample (which still needs proper filtering, but at least is fully energy conserving), but just shifted towards the upper-left pixel. It is important to “undo” the shift when doing the first bloom filtering pass.
#### [Timothy Lottes](http://timothylottes.blogspot.com/ "timothylottes@gmail.com") -
Re “randomized sampling”, I have not tried this either. Something to keep in mind, in theory, fixed sampling locations can be optimized by the driver into constants avoiding address computation. Fixed sample locations also insure that the filter weight computation can be factored into constants. Also the energy of the kernel is mostly in the samples inside the pixel (say over 50%, for 4 samples for 4xMSAA), so one always wants to include those samples. The rest of the energy distributed over a much larger number of samples (say up to 32 samples if using a 3x3 pixel kernel). In the aim of reducing samples, it probably makes more sense to do a fixed truncation of samples towards the outside of the kernel as they contribute less energy. For my game (a personal independent project) I’ve been using 4xMSAA with 16 or 20 samples (circle pattern instead of full 32 in the 3x3 pixel square) using kernel {B=1,C=0} (no negative lobes) and resolving in one pass.
#### [Osamar]( "osamar2001@hotmail.com") -
I have not the mathematical or programming knoledge. But, it could be faster to calculate a “step pyramid” like filter, or all cost more or less the same?
#### [AmazingFactory]( "first10@btinternet.com") -
Impressive work The “Filtering in PRMan” article has a great description of aliasing: Aliasing = high frequency data masquerading as low-frequency data (jaggies, Moiré, noise, sparkling, popping, etc.) that results from sampling a signal with improper filtering. And since the aliasing is mixed in with the real low-frequency data, once added it cannot be removed.
#### [mkh]( "") -
Nice article! I’m interested in playing with the sample, however the download at Codeplex seems to be broken. Could you reupload the sample? Thanks alot! Cheers!
#### [Jeremy Shopf » Image Reconstruction and MSAA](http://jshopf.com/blog/?p=304 "") -
[…] posted a truly excellent read regarding resolving multi-sampled images titled “Experimenting with Reconstruction Filters for MSAA Resolve”. Even better, he had previously posted a nice sampling theory primer and introduction to MSAA which […]
#### [MJP](http://mynameismjp.wordpress.com/ "mpettineo@gmail.com") -
The Codeplex link still seems to be working for me, but just in case I uploaded the zip file to my Google Drive as well: https://docs.google.com/file/d/0B9NkyJjiExTjR3Z0YzRIQUdYWkU/edit?usp=sharing
#### [anteru]( "wordpress@catchall.shelter13.net") -
Cool, I did something similar (but less extensive) two years ago: https://bitbucket.org/Anteru/wideaaresolve That was partially fallout from the SRAA research, which requires a wider resolve for good quality. Especially on the test scene I used, with lots of contrast, Lanczos resolve is so much better than the standard MSAA that it’s not even funny any more. One thing I never got around to try is randomized sampling, by picking a subset of the samples for each pixel. This will introduce noise, but should make it faster as you need to fetch less samples per pixel.
#### [Timothy Lottes]( "tlottes@nvidia.com") -
Awesome write up. As for performance of custom resolves, I’ve got a few performance related bugs filled on this at NVIDIA so If anyone is looking to ship a title using a wide resolve kernel, please send email note to nvidia.com, user tlottes, and I can use as leverage to get higher priority getting those (software) bugs fixed.
#### [deadc0de](http://c0de517e.blogspot.ca "kenpex@tin.it") -
You rock - Angelo
#### [MJP](http://mynameismjp.wordpress.com/ "mpettineo@gmail.com") -
@anteru: that’s a really cool demo, I’ve never seen it before! What you’d *really* want to improve the sampling quality is to adjust the sampling positions used for rasterization per-pixel, but unfortunately with GPU’s it seems that we’re stuck with a fixed pattern. @Timothy: thank you! I’ll be sending you an email shortly. @Angelo: thank you sir. :-)
#### [Image Reconstruction and MSAAJeremy Shopf](http://www.jshopf.net/?p=304 "") -
[…] posted a truly excellent read regarding resolving multi-sampled images titled “Experimenting with Reconstruction Filters for MSAA Resolve”. Even better, he had previously posted a nice sampling theory primer and introduction to MSAA which […]
#### [SIGGRAPH FOLLOW-UP: 2015 Edition | The Danger Zone](https://mynameismjp.wordpress.com/2015/08/16/siggraph-2015/ "") -
[…] play around with the shaders. The sample is essentially a successor to the MSAAFilter sample that I put out nearly 3 years ago, which accompanied a blog post where I shared some of my research on using higher-order filtering […]
#### [MJP](http://mynameismjp.wordpress.com/ "mpettineo@gmail.com") -
Hey there, that was a bug in the original implementation. I had fixed it at some point, but I guess that the version uploaded here is still the original with the bug. Anyhow, I would suggest looking at the newer MSAAFilter sample that I posted on GitHub, since that one improves on the old sample in just about every way: https://github.com/TheRealMJP/MSAAFilter
#### [Simpetar]( "simpetar@yandex.ru") -
Sorry, may be i missed something but i cannot understand the line 196 in your resolve.hlsl shader: SampleOffset += SampleOffsets[subSampleIdx].xy; Why is here += in the inner loop? As far as i understand it will be correct only for index 0. Thank you for your answer.