Inferred Rendering
So like I said in my last post, I’ve been doing some research into Inferred Rendering. If you’re not familiar with the technique, Scott Kircher has the original paper and presentation materials hosted on his website. The main topic of the paper is what they call “Discontinuity Sensitive Filtering”, or “DSF” for short. Basically it’s standard 2x2 bilinear filtering, except in addition to sampling the texture you’re interested in you also sample what they call a a “DSF buffer” containing depth, an instance ID (semi-unique for each instance rendering on-screen), and a normal ID (a semi-unique value identifying areas where the normals are continuous). By comparing the values sampled from the DSF buffer with the values supplied for the mesh being rendered (they apply the DSF filter during final pass of a light-prepass renderer where meshes are re-rendered and sample from the lighting buffer), they can bias the bilinear weights so that texels not “belonging” to the object being rendered are automatically rejected. They go through all of this effort so that they can do two things:
-
They can use a lower-res G-Buffer and L-Buffer but still render their geometry at full res
-
They can light transparent surfaces using a deferred approach, by applying a stipple pattern when rendering the transparents to the G-Buffer
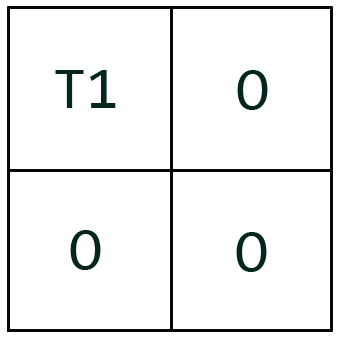
The second part is what’s interesting, so let’s talk about. Basically what they do is they break up the G-Buffer into 2x2 quads. Then for transparent objects, an output mask is applied so that only one pixel in the quad is actually written to. Then by rotating the mask, you could render up to 3 layers of transparency into the quad and still have opaques visible underneath. For a visual, this is what a quad would look like if only one transparent layer was rendered:
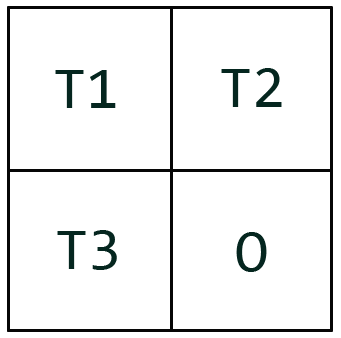
So “T1” would be from the transparent surface, and “O” would be from opaque objects below it. This is what it would look like if you had 3 transparent surfaces overlapping:
After laying out your G-Buffer, you then fill your L-Buffer (Lighting Buffer) with values just like you would with a standard Light Pre-pass renderer. After you’ve filled your L-Buffer, you re-render your opaque geometry and sample your L-Buffer using a DSF filter so that only the texels belonging to opaque geometry get samples. Then you render your transparent geometry with blending enabled, each time adjusting your DSF sample positions so that the 4 nearest texels (according to the output mask you used when rendering it to the G-Buffer) are sampled.
So you can light your transparents just like any other geometry, which is really cool stuff if you have a lot dynamic lights and shadows (which you probably do if you’re doing deferred rendering in the first place). But now come the downsides:
-
Transparents end up being lit at 1/4 resolution, and opaques underneath transparents will be lit at either 3/4, 2/4, or 1/4 resolution. How bad this looks mainly depends on whether you have high-frequency normal maps, since the lighting itself is generally low-frequency. You’re also helped a bit by the fact that your diffuse albedo texture will still be sampled at full rate. Here’s a screenshot comparing forward-rendered transparents (left-side), with deferred transparents (right-side):
 You can see that aliasing artifacts become visible on the transparent layers, due to the normal maps. Even more noticable is shadow map aliasing, which becomes noticeably worse on the transparent layers since it’s only sampled at 1/4 rate. Here’s a screenshot showing the same comparison, this time with normal maps disabled:
 The aliasing becomes much less visible on the unshadowed areas without normal mapping disabled, since now the normals are much lower-frequency. However you still have the same problem with shadow map aliasing.
 -
The DSF filtering is not cheap. Or at least, the way I implemented it wasn’t cheap. My code can probably be optimized a bit to reduce instructions, but unless I’m missing something fundamental I don’t think you could make any significant improvements. If someone does figure out anything, please let me know! Anyway when compiling my opaque pixel shader with fxc.exe (from August 2009 SDK) using ps_3_0, I get a nice 11 instructions (9 math, 2 texture) when no DSF filtering is used. When filtering is added in, it jumps up to a nasty 64 instructions! (55 math, 9 texure). For transparents the shader jumps up again (71 math, 9 texture) since some additional math is needed to adjust the filtering in order to sample according to the stipple pattern. Running the shaders through NVShaderPerf gives me the following:
 Here’s what I get with ATI’s GPU ShaderAnalyzer:
 So like I said, it’s not definitely not free. In the paper they mention that they also use a half-sized G-Buffer + L-Buffer which offsets the cost of the extra filtering. When running my test app on my GTX 275 at half-res G-Buffer there’s almost no difference in framerate and at quarter-res it’s actually faster to defer the transparents. Using a full-res G-Buffer/L-Buffer it’s quicker to forward-render the transparents, with 4 large point lights and 1 directional light + shadow. So I’d imagine for a full-res G-Buffer/L-Buffer you’d need quite a few dynamic lights for it to pay off when going deferred for transparents. But in my opinion, the decrease in quality when using a lower-res G-Buffer just isn’t worth it. Here’s a screenshot showing deferred transparents with half-sized G-Buffer:
Notice how bad the shadows look on the transparents, since now the shadow map is being sampled at 1/8th rate. Even on the opaques you start to lose quite a bit of the normal map detail.
-
You only get 3 layers of transparency. However past 3 layers it would probably be really hard to notice that you’re missing anything, at least to the average player.
-
Since you use instance ID’s to identify transparent layers, you’ll have problems with models that have multiple transparency levels (like a car, which has 4 windows)
Regardless, I think the technique is interesting enough to look into. Personally when I read the paper I had major concerns about what shadows would look like on the transparents (especially with a lower-res L-Buffer), which is what lead to me to make a prototype with XNA so that I could evaluate some of the more pathological cases that could pop up. If you’re also interested, I’ve uploaded the binary here, and the source here. If you want to run the binary you’ll need the XNA 3.1 Redistributable, located here.
One thing you’ll notice about my implementation is that I didn’t factor in normals at all in the DSF filter, and instead I stored depth in a 16-bit component and instance ID in the the other 16 bits. This would give you much more than the 256 instances that the original implementation is limited to, at the expense of some artifacts around areas where the normal changes drastically on the same mesh.
Comments:
D3D Performance and Debugging Tools Round-Up: PIX « The Danger Zone -
[…] With everyone and their mother using a deferred renderer these days, more often than not what’s displayed on the screen is the result of several passes. This means that when things go wrong, it’s hard to guess the problem since it could have occurred in multiple places. Fortunately PIX can help us by letting us pick any singular Draw call and see exactly what was drawn to the screen. All you have to do s capture a frame, find the Draw call in the Event view, and then click on the “Render” tab in the Details view. Here’s a screenshot I took showing what was drawn to the normal-specular buffer during the G-Buffer pass of my Inferred Rendering Sample: […]
#### [Inferred And Deferred « Sgt. Conker](http://www.sgtconker.com/2010/01/inferred-and-deferred/ "") -
[…] Enter Matt “Advanced Stuffs” Pettineo. […]
#### [Mike]( "b1691505@uggsrock.com") -
The download links to your SkyDrive files are broken…
#### [Garuda]( "garuda_xc@126.com") -
Great post! A lot of help Small question, why use “return float4(color * Alpha, Alpha);” and “SrcBlend = ONE;” during alpha blend? Is it an optimization trick?
#### [mpettineo](http://mynameismjp.wordpress.com/ "mpettineo@gmail.com") -
It’s called “premultiplied alpha”. Tom Forsyth has a comprehensive overview here: http://home.comcast.net/~tom_forsyth/blog.wiki.html#[[Premultiplied%20alpha]] Shawn Hargreaves also has a nice overview here: http://blogs.msdn.com/shawnhar/archive/2009/11/06/premultiplied-alpha.aspx
#### [Garuda]( "garuda_xc@126.com") -
Thanks! Also some confusion in lighting computation. What’s specular level “((specExponent + 8.0f) / (8.0f * 3.14159265f))” about? And why diffuse factor is multiplied to specular factor as “specular * NdotL” ?
#### [mpettineo](http://mynameismjp.wordpress.com/ "mpettineo@gmail.com") -
That bit with the specular is a normalization factor. It’s there to ensure that energy is conserved for the BRDF. You can derive it if you take the blinn-phong equation, set up an integral around the hemisphere, and solve for 1. The diffuse factor is multiplied in so that the attenuation is applied to the specular, and so that you don’t get incorrect specular reflections due to normal maps.
#### [Garuda]( "garuda_xc@126.com") -
Thank you! You are a helpful guru~
#### [Lighting alpha objects in deferred rendering contexts | Interplay of Light](http://interplayoflight.wordpress.com/2013/09/24/lighting-alpha-objects-in-deferred-rendering-contexts/ "") -
[…] Use some sort of screen door transparency like the one implemented by Inferred rendering. This is basically opaque rendering in which the “alpha” object is rendered on top of […]


